搜索到
20
篇与
的结果
-
![AI-折腾记-02-(wsl2环境下运行docker+open-webui)]() AI-折腾记-02-(wsl2环境下运行docker+open-webui) 注意:承接前文 AI-折腾记-01-(wsl2环境下运行docker+cuda:pytorch/onnxruntime)以下过程无难度,故省略:Windows 上 Ollam 安装Ollam 添加模型 qwen2:1.5Ollam 命令行使用上述可参考:Ollama - CLI ReferenceOllama - Models - qwen2:1.5准备就绪后的表现为:可以在 Web 浏览器中访问 http://127.0.0.1:11434/, 能得到如下输出Ollama is running可以在 终端(cmd等) 中执行ollama run qwen2:1.5b, 能进行对话WSL2 中使用 docker 运行 open-webuihttps://github.com/open-webui/open-webuiDocker 镜像加速参考:https://github.com/dongyubin/DockerHubhttps://github.com/kubesre/docker-registry-mirrorshttps://dockerimage.gbfeng.com/image/ghcr.io/open-webui/open-webui:mainDocker公益镜像huggingface 模型加速参考: HF-Mirror运行 open-webui启用 CUDA 方式使用镜像 open-webui/open-webui:cuda, 如果不启用 CUDA 则使用镜像 open-webui/open-webui:main# 拉取 open-webui 镜像 sudo docker pull swr.cn-east-3.myhuaweicloud.com/kubesre/ghcr.io/open-webui/open-webui:cuda sudo docker tag swr.cn-east-3.myhuaweicloud.com/kubesre/ghcr.io/open-webui/open-webui:cuda ghcr.io/open-webui/open-webui:cuda# 运行 open-webui 容器 sudo docker run --gpus all -it --rm -p 18080:8080 -v ./open-webui:/app/backend/data --add-host=host.docker.internal:host-gateway -e OLLAMA_BASE_URL=http://host.docker.internal:11434 -e HF_ENDPOINT=https://hf-mirror.com -e PIP_INDEX_URL=https://pypi.tuna.tsinghua.edu.cn/simple -e USE_CUDA_DOCKER=true --name open-webui --restart no ghcr.io/open-webui/open-webui:cuda上述 docker run 命令关键参数说明--gpus all 使用 Docker CudaToolkit--add-host=host.docker.internal:host-gateway 主机名映射-e OLLAMA_BASE_URL=http://host.docker.internal:11434 指定使用宿主机的 Ollama, 如果有报错提示连接失败,可以考虑使用宿主机的局域网IP(举例: -e OLLAMA_BASE_URL=http://192.168.1.2:11434)-e HF_ENDPOINT=https://hf-mirror.com huggingface 模型加速-e PIP_INDEX_URL=https://pypi.tuna.tsinghua.edu.cn/simple pip 加速-e USE_CUDA_DOCKER=true 启用 CUDA访问 http://127.0.0.1:18080/ 即可注意: 如果 Open WebUI 界面模型下拉列表没有模型,但是终端执行 ollama list 的结果有模型,请设置环境变量 OLLAMA_HOST 为 0.0.0.0:11434, 然后重启 Ollama 即可。
AI-折腾记-02-(wsl2环境下运行docker+open-webui) 注意:承接前文 AI-折腾记-01-(wsl2环境下运行docker+cuda:pytorch/onnxruntime)以下过程无难度,故省略:Windows 上 Ollam 安装Ollam 添加模型 qwen2:1.5Ollam 命令行使用上述可参考:Ollama - CLI ReferenceOllama - Models - qwen2:1.5准备就绪后的表现为:可以在 Web 浏览器中访问 http://127.0.0.1:11434/, 能得到如下输出Ollama is running可以在 终端(cmd等) 中执行ollama run qwen2:1.5b, 能进行对话WSL2 中使用 docker 运行 open-webuihttps://github.com/open-webui/open-webuiDocker 镜像加速参考:https://github.com/dongyubin/DockerHubhttps://github.com/kubesre/docker-registry-mirrorshttps://dockerimage.gbfeng.com/image/ghcr.io/open-webui/open-webui:mainDocker公益镜像huggingface 模型加速参考: HF-Mirror运行 open-webui启用 CUDA 方式使用镜像 open-webui/open-webui:cuda, 如果不启用 CUDA 则使用镜像 open-webui/open-webui:main# 拉取 open-webui 镜像 sudo docker pull swr.cn-east-3.myhuaweicloud.com/kubesre/ghcr.io/open-webui/open-webui:cuda sudo docker tag swr.cn-east-3.myhuaweicloud.com/kubesre/ghcr.io/open-webui/open-webui:cuda ghcr.io/open-webui/open-webui:cuda# 运行 open-webui 容器 sudo docker run --gpus all -it --rm -p 18080:8080 -v ./open-webui:/app/backend/data --add-host=host.docker.internal:host-gateway -e OLLAMA_BASE_URL=http://host.docker.internal:11434 -e HF_ENDPOINT=https://hf-mirror.com -e PIP_INDEX_URL=https://pypi.tuna.tsinghua.edu.cn/simple -e USE_CUDA_DOCKER=true --name open-webui --restart no ghcr.io/open-webui/open-webui:cuda上述 docker run 命令关键参数说明--gpus all 使用 Docker CudaToolkit--add-host=host.docker.internal:host-gateway 主机名映射-e OLLAMA_BASE_URL=http://host.docker.internal:11434 指定使用宿主机的 Ollama, 如果有报错提示连接失败,可以考虑使用宿主机的局域网IP(举例: -e OLLAMA_BASE_URL=http://192.168.1.2:11434)-e HF_ENDPOINT=https://hf-mirror.com huggingface 模型加速-e PIP_INDEX_URL=https://pypi.tuna.tsinghua.edu.cn/simple pip 加速-e USE_CUDA_DOCKER=true 启用 CUDA访问 http://127.0.0.1:18080/ 即可注意: 如果 Open WebUI 界面模型下拉列表没有模型,但是终端执行 ollama list 的结果有模型,请设置环境变量 OLLAMA_HOST 为 0.0.0.0:11434, 然后重启 Ollama 即可。 -
![AI-折腾记-01-(wsl2环境下运行docker+cuda:pytorch/onnxruntime)]() AI-折腾记-01-(wsl2环境下运行docker+cuda:pytorch/onnxruntime) 注意:以下过程无难度,故省略:安装 Nvidia 驱动启用 WSL配置使用 WSL2 版本WSL 安装 Ubuntu上述可参考:如何使用 WSL 在 Windows 上安装 LinuxStep by Step Procedure to Install WSL2 on Windows And Run Ubuntu on Windows Using WSL2How to install Linux WSL2 on Windows 10 and Windows 11How To Install Windows Subsystem For Linux (WSL2) On Windows 11准备就绪后的表现为:可以在 WSL 的 Ubuntu 中执行 which nvidia-smi, 能得到如下输出/usr/lib/wsl/lib/nvidia-smi可以在 WSL 的 Ubuntu 中执行 nvidia-smi, 能正常输出以下所有操作均在上述过程就绪之后环境系统: Windows 11 + WSL2 + Ubuntu 22.04GPU:NVIDIA GeForce RTX 3070Driver Version: 555.99 (Windows 11 安装 Geforce Game Ready 驱动 555.99)NVIDIA-SMI: 555.99CUDA Version: 12.5Docker CUDA 配置参考: Installing Docker and The Docker Utility Engine for NVIDIA GPUsInstall Docker Engine on Ubuntu | Docker DocumentationSet up Docker's apt repository.# Add Docker's official GPG key: sudo apt-get update sudo apt-get install ca-certificates curl sudo install -m 0755 -d /etc/apt/keyrings sudo curl -fsSL https://download.docker.com/linux/ubuntu/gpg -o /etc/apt/keyrings/docker.asc sudo chmod a+r /etc/apt/keyrings/docker.asc # Add the repository to Apt sources: echo \ "deb [arch=$(dpkg --print-architecture) signed-by=/etc/apt/keyrings/docker.asc] https://download.docker.com/linux/ubuntu \ $(. /etc/os-release && echo "$VERSION_CODENAME") stable" | \ sudo tee /etc/apt/sources.list.d/docker.list > /dev/null sudo apt-get updateInstall the Latest Docker packages.sudo apt-get install docker-ce docker-ce-cli containerd.io docker-buildx-plugin docker-compose-pluginVerify that the Docker Engine installation is successfulsudo docker run -it --rm hello-worldInstalling the NVIDIA Container Toolkit | NVIDIA DocumentationConfigure the apt production repositorycurl -fsSL https://nvidia.github.io/libnvidia-container/gpgkey | sudo gpg --dearmor -o /usr/share/keyrings/nvidia-container-toolkit-keyring.gpg \ && curl -s -L https://nvidia.github.io/libnvidia-container/stable/deb/nvidia-container-toolkit.list | \ sed 's#deb https://#deb [signed-by=/usr/share/keyrings/nvidia-container-toolkit-keyring.gpg] https://#g' | \ sudo tee /etc/apt/sources.list.d/nvidia-container-toolkit.listInstall the NVIDIA Container Toolkit packages:sudo apt-get update sudo apt-get install -y nvidia-container-toolkitConfigure the container runtime by using the nvidia-ctk command:sudo nvidia-ctk runtime configure --runtime=docker sudo systemctl restart dockerTesting Docker and NVIDIA Container Runtime: Running a Sample Workload | NVIDIA Documentationsudo docker run -it --rm --runtime=nvidia --gpus all ubuntu nvidia-smiPyTorch-CUDA 测试参考: https://hub.docker.com/r/pytorch/pytorch/tags?page=&page_size=&name=cuda12&ordering=last_updated参考: How to Install PyTorch on the GPU with Docker# 运行 pytorch-cuda 容器 sudo docker pull pytorch/pytorch:2.3.1-cuda12.1-cudnn8-runtime sudo docker run -it --rm --runtime=nvidia --gpus all pytorch/pytorch:2.3.1-cuda12.1-cudnn8-runtime python# python 测试代码 import torch print(torch.cuda.is_available()) print(torch.cuda._is_compiled()) print(torch.__config__.show())Docker 构建 ONNX Runtime CUDA 镜像参考: https://github.com/microsoft/onnxruntime/blob/main/dockerfiles/README.md#cuda# Build the docker image git clone https://github.com/microsoft/onnxruntime cd onnxruntime/dockerfiles/ sudo docker build -t onnxruntime-cuda -f Dockerfile.cuda .. # Run the Docker image sudo docker run -it --rm --runtime=nvidia --gpus all onnxruntime-cuda # or sudo nvidia-docker run -it --rm onnxruntime-cuda
AI-折腾记-01-(wsl2环境下运行docker+cuda:pytorch/onnxruntime) 注意:以下过程无难度,故省略:安装 Nvidia 驱动启用 WSL配置使用 WSL2 版本WSL 安装 Ubuntu上述可参考:如何使用 WSL 在 Windows 上安装 LinuxStep by Step Procedure to Install WSL2 on Windows And Run Ubuntu on Windows Using WSL2How to install Linux WSL2 on Windows 10 and Windows 11How To Install Windows Subsystem For Linux (WSL2) On Windows 11准备就绪后的表现为:可以在 WSL 的 Ubuntu 中执行 which nvidia-smi, 能得到如下输出/usr/lib/wsl/lib/nvidia-smi可以在 WSL 的 Ubuntu 中执行 nvidia-smi, 能正常输出以下所有操作均在上述过程就绪之后环境系统: Windows 11 + WSL2 + Ubuntu 22.04GPU:NVIDIA GeForce RTX 3070Driver Version: 555.99 (Windows 11 安装 Geforce Game Ready 驱动 555.99)NVIDIA-SMI: 555.99CUDA Version: 12.5Docker CUDA 配置参考: Installing Docker and The Docker Utility Engine for NVIDIA GPUsInstall Docker Engine on Ubuntu | Docker DocumentationSet up Docker's apt repository.# Add Docker's official GPG key: sudo apt-get update sudo apt-get install ca-certificates curl sudo install -m 0755 -d /etc/apt/keyrings sudo curl -fsSL https://download.docker.com/linux/ubuntu/gpg -o /etc/apt/keyrings/docker.asc sudo chmod a+r /etc/apt/keyrings/docker.asc # Add the repository to Apt sources: echo \ "deb [arch=$(dpkg --print-architecture) signed-by=/etc/apt/keyrings/docker.asc] https://download.docker.com/linux/ubuntu \ $(. /etc/os-release && echo "$VERSION_CODENAME") stable" | \ sudo tee /etc/apt/sources.list.d/docker.list > /dev/null sudo apt-get updateInstall the Latest Docker packages.sudo apt-get install docker-ce docker-ce-cli containerd.io docker-buildx-plugin docker-compose-pluginVerify that the Docker Engine installation is successfulsudo docker run -it --rm hello-worldInstalling the NVIDIA Container Toolkit | NVIDIA DocumentationConfigure the apt production repositorycurl -fsSL https://nvidia.github.io/libnvidia-container/gpgkey | sudo gpg --dearmor -o /usr/share/keyrings/nvidia-container-toolkit-keyring.gpg \ && curl -s -L https://nvidia.github.io/libnvidia-container/stable/deb/nvidia-container-toolkit.list | \ sed 's#deb https://#deb [signed-by=/usr/share/keyrings/nvidia-container-toolkit-keyring.gpg] https://#g' | \ sudo tee /etc/apt/sources.list.d/nvidia-container-toolkit.listInstall the NVIDIA Container Toolkit packages:sudo apt-get update sudo apt-get install -y nvidia-container-toolkitConfigure the container runtime by using the nvidia-ctk command:sudo nvidia-ctk runtime configure --runtime=docker sudo systemctl restart dockerTesting Docker and NVIDIA Container Runtime: Running a Sample Workload | NVIDIA Documentationsudo docker run -it --rm --runtime=nvidia --gpus all ubuntu nvidia-smiPyTorch-CUDA 测试参考: https://hub.docker.com/r/pytorch/pytorch/tags?page=&page_size=&name=cuda12&ordering=last_updated参考: How to Install PyTorch on the GPU with Docker# 运行 pytorch-cuda 容器 sudo docker pull pytorch/pytorch:2.3.1-cuda12.1-cudnn8-runtime sudo docker run -it --rm --runtime=nvidia --gpus all pytorch/pytorch:2.3.1-cuda12.1-cudnn8-runtime python# python 测试代码 import torch print(torch.cuda.is_available()) print(torch.cuda._is_compiled()) print(torch.__config__.show())Docker 构建 ONNX Runtime CUDA 镜像参考: https://github.com/microsoft/onnxruntime/blob/main/dockerfiles/README.md#cuda# Build the docker image git clone https://github.com/microsoft/onnxruntime cd onnxruntime/dockerfiles/ sudo docker build -t onnxruntime-cuda -f Dockerfile.cuda .. # Run the Docker image sudo docker run -it --rm --runtime=nvidia --gpus all onnxruntime-cuda # or sudo nvidia-docker run -it --rm onnxruntime-cuda -
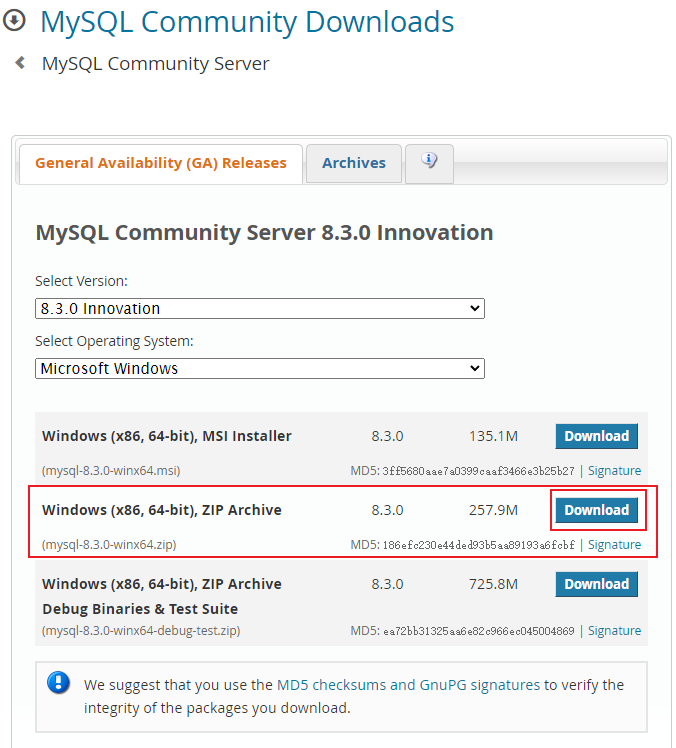
![Windows上非安装方式配置MySQL]() Windows上非安装方式配置MySQL MySQL官方下载MySQL压缩包文件https://dev.mysql.com/downloads/mysql/下载后得到的zip文件(比如 mysql-8.3.0-winx64.zip)解压到电脑上(比如 D:\portable\mysql-8.3.0-winx64),得到如下目录内容:初始化, 终端(比如 cmd.exe) 中,进入上图的 bin 目录,执行如下初始化命令mysqld --initialize等待上一步执行完成后,创建一个文件(比如 mysql-init.txt)用来设置 root 用户的密码,内容如下:ALTER USER 'root'@'localhost' IDENTIFIED BY 'root666';将root用户的密码设置为root666启动 MySQL服务器,并加载初始化文件:mysqld --init-file=D:\portable\mysql-8.3.0-winx64\bin\mysql-init.txt --console等待上一步启动后,停止 MySQL 服务器,同时验证上一步执行的修改操作是否成功:mysqladmin -u root -p shutdown至此,MySQL配置已完成,可以正常启动 MySQL了:mysqld --console--console 参数指示将日志输出到控制台, 不加则会将日志输出到文件MySQL 正式启动后,可以连接验证:mysql -uroot -p
Windows上非安装方式配置MySQL MySQL官方下载MySQL压缩包文件https://dev.mysql.com/downloads/mysql/下载后得到的zip文件(比如 mysql-8.3.0-winx64.zip)解压到电脑上(比如 D:\portable\mysql-8.3.0-winx64),得到如下目录内容:初始化, 终端(比如 cmd.exe) 中,进入上图的 bin 目录,执行如下初始化命令mysqld --initialize等待上一步执行完成后,创建一个文件(比如 mysql-init.txt)用来设置 root 用户的密码,内容如下:ALTER USER 'root'@'localhost' IDENTIFIED BY 'root666';将root用户的密码设置为root666启动 MySQL服务器,并加载初始化文件:mysqld --init-file=D:\portable\mysql-8.3.0-winx64\bin\mysql-init.txt --console等待上一步启动后,停止 MySQL 服务器,同时验证上一步执行的修改操作是否成功:mysqladmin -u root -p shutdown至此,MySQL配置已完成,可以正常启动 MySQL了:mysqld --console--console 参数指示将日志输出到控制台, 不加则会将日志输出到文件MySQL 正式启动后,可以连接验证:mysql -uroot -p -
![自定义 node.js Docker 镜像]() 自定义 node.js Docker 镜像 Dockerfile:FROM ghcr.io/linuxserver/baseimage-alpine:3.18 SHELL ["/bin/bash", "-c"] RUN echo $'#!/bin/bash \n\ set -e \n\ \n\ # Run command with node if the first argument contains a "-" or is not a system command. The last \n\ # part inside the "{}" is a workaround for the following bug in ash/dash: \n\ # https://bugs.debian.org/cgi-bin/bugreport.cgi?bug=874264 \n\ if [ "${1#-}" != "${1}" ] || [ -z "$(command -v "${1}")" ] || { [ -f "${1}" ] && ! [ -x "${1}" ]; }; then \n\ set -- node "$@" \n\ fi \n\ \n\ exec "$@"' > /usr/local/bin/docker-entrypoint.sh RUN chmod a+x /usr/local/bin/docker-entrypoint.sh RUN groups RUN users RUN whoami RUN groupadd --non-unique --gid 1000 node RUN useradd --non-unique --uid 1000 --gid node --shell /bin/bash --create-home node ENV NODE_VERSION 21.1.0 ENV ARCH x64 RUN curl -fsSLO --compressed "https://unofficial-builds.nodejs.org/download/release/v$NODE_VERSION/node-v$NODE_VERSION-linux-$ARCH-musl.tar.xz" RUN ls -lha RUN tar -xJf "node-v$NODE_VERSION-linux-$ARCH-musl.tar.xz" -C /usr/local --strip-components=1 --no-same-owner RUN rm -f "node-v$NODE_VERSION-linux-$ARCH-musl.tar.xz" RUN ln -s /usr/local/bin/node /usr/local/bin/nodejs RUN apk add --no-cache libstdc++ RUN node --version RUN npm --version # RUN wget -qO- https://get.pnpm.io/install.sh | ENV="$HOME/.bashrc" SHELL="$(which bash)" bash - RUN npm config set registry https://registry.npmmirror.com RUN npm install -g pm2 RUN npm install -g pnpm RUN pnpm --version RUN rm -rf /tmp/* $HOME/.cache ENTRYPOINT ["docker-entrypoint.sh"] CMD [ "node" ]build:docker build --progress plain --rm --tag gsw945/node:v0.0.1 .参考安装 | pnpm - 使用 npm 安装https://github.com/nodejs/docker-node/blob/main/21/alpine3.18/Dockerfilehttps://github.com/linuxserver/docker-baseimage-alpine/pkgs/container/baseimage-alpine/137430303?tag=3.18How to write commands with multiple lines in Dockerfile while preserving the new lines?Dockerfile replicate the host user UID and GID to the image
自定义 node.js Docker 镜像 Dockerfile:FROM ghcr.io/linuxserver/baseimage-alpine:3.18 SHELL ["/bin/bash", "-c"] RUN echo $'#!/bin/bash \n\ set -e \n\ \n\ # Run command with node if the first argument contains a "-" or is not a system command. The last \n\ # part inside the "{}" is a workaround for the following bug in ash/dash: \n\ # https://bugs.debian.org/cgi-bin/bugreport.cgi?bug=874264 \n\ if [ "${1#-}" != "${1}" ] || [ -z "$(command -v "${1}")" ] || { [ -f "${1}" ] && ! [ -x "${1}" ]; }; then \n\ set -- node "$@" \n\ fi \n\ \n\ exec "$@"' > /usr/local/bin/docker-entrypoint.sh RUN chmod a+x /usr/local/bin/docker-entrypoint.sh RUN groups RUN users RUN whoami RUN groupadd --non-unique --gid 1000 node RUN useradd --non-unique --uid 1000 --gid node --shell /bin/bash --create-home node ENV NODE_VERSION 21.1.0 ENV ARCH x64 RUN curl -fsSLO --compressed "https://unofficial-builds.nodejs.org/download/release/v$NODE_VERSION/node-v$NODE_VERSION-linux-$ARCH-musl.tar.xz" RUN ls -lha RUN tar -xJf "node-v$NODE_VERSION-linux-$ARCH-musl.tar.xz" -C /usr/local --strip-components=1 --no-same-owner RUN rm -f "node-v$NODE_VERSION-linux-$ARCH-musl.tar.xz" RUN ln -s /usr/local/bin/node /usr/local/bin/nodejs RUN apk add --no-cache libstdc++ RUN node --version RUN npm --version # RUN wget -qO- https://get.pnpm.io/install.sh | ENV="$HOME/.bashrc" SHELL="$(which bash)" bash - RUN npm config set registry https://registry.npmmirror.com RUN npm install -g pm2 RUN npm install -g pnpm RUN pnpm --version RUN rm -rf /tmp/* $HOME/.cache ENTRYPOINT ["docker-entrypoint.sh"] CMD [ "node" ]build:docker build --progress plain --rm --tag gsw945/node:v0.0.1 .参考安装 | pnpm - 使用 npm 安装https://github.com/nodejs/docker-node/blob/main/21/alpine3.18/Dockerfilehttps://github.com/linuxserver/docker-baseimage-alpine/pkgs/container/baseimage-alpine/137430303?tag=3.18How to write commands with multiple lines in Dockerfile while preserving the new lines?Dockerfile replicate the host user UID and GID to the image -
![有用的几条Git命令]() 有用的几条Git命令 git fsckgit fsck 命令用于检查 Git 数据库内部的完整性,找出问题对象。这3个选项具体用法如下:git fsck --dangling:显示悬空对象(dangling object),即孤立的提交/树/blobs,不被任何其他对象引用。git fsck --unreachable:显示不可达对象(unreachable object),即不可到达的对象,不被任何一个分支或标签引用。git fsck --lost-found:显示遗失的对象(lost found), 位于 .git/lost-found/ 其他 commit 引用了的对象。总结:dangling 对象不被任何对象引用,但仍在数据库中。unreachable 对象不被任何分支或标签引用,可能在重写历史后出现。lost-found 对象被其他 commit 引用,但不在当前分支或标签中。这3个选项可以帮助我们发现和恢复在重写历史时“丢失”的对象,修复问题。git log示例命令: git log --format="hash: %H%nauthor: %an%ndate: %aI%n%n%B"--fromat参数解释:%H - commit hash (hash 值)%an - author name (作者用户名)%aI - author date, ISO 8601 格式 (提交时间)%B - commit message body (提交信息)%n - 换行符实际应用显示不可达的Commit信息git fsck --unreachable | grep commit | cut -d' ' -f3 | xargs -I {} git log --format="hash: %H%nauthor: %an%ndate: %aI%n%n%B" -n 1 {}参考Look up commit log for commit ID in GitHow can I view a git log of just one user's commits?git fsck: how --dangling vs. --unreachable vs. --lost-found differ?How can I find an unreachable commit hash in a GIT repository by keywords?
有用的几条Git命令 git fsckgit fsck 命令用于检查 Git 数据库内部的完整性,找出问题对象。这3个选项具体用法如下:git fsck --dangling:显示悬空对象(dangling object),即孤立的提交/树/blobs,不被任何其他对象引用。git fsck --unreachable:显示不可达对象(unreachable object),即不可到达的对象,不被任何一个分支或标签引用。git fsck --lost-found:显示遗失的对象(lost found), 位于 .git/lost-found/ 其他 commit 引用了的对象。总结:dangling 对象不被任何对象引用,但仍在数据库中。unreachable 对象不被任何分支或标签引用,可能在重写历史后出现。lost-found 对象被其他 commit 引用,但不在当前分支或标签中。这3个选项可以帮助我们发现和恢复在重写历史时“丢失”的对象,修复问题。git log示例命令: git log --format="hash: %H%nauthor: %an%ndate: %aI%n%n%B"--fromat参数解释:%H - commit hash (hash 值)%an - author name (作者用户名)%aI - author date, ISO 8601 格式 (提交时间)%B - commit message body (提交信息)%n - 换行符实际应用显示不可达的Commit信息git fsck --unreachable | grep commit | cut -d' ' -f3 | xargs -I {} git log --format="hash: %H%nauthor: %an%ndate: %aI%n%n%B" -n 1 {}参考Look up commit log for commit ID in GitHow can I view a git log of just one user's commits?git fsck: how --dangling vs. --unreachable vs. --lost-found differ?How can I find an unreachable commit hash in a GIT repository by keywords? -
![文件检索相关命令行工具]() 文件检索相关命令行工具 BATA cat(1) clone with wings.特性:语法高亮Git 集成不可打印(non-printable)字符可视化自动分页fzfA command-line fuzzy finderfdA simple, fast and user-friendly alternative to 'find'ripgrep((rg))ripgrep recursively searches directories for a regex pattern while respecting your gitignoreripgrep 常用命令示例:# 查看支持的类型(type)列表 rg --type-list # 添加一个自定义的类型 mmkkdd, 后缀名为 *.md, 排除.git、bin、obj、node_modules文件夹,搜索 babel rg --type-add "mmkkdd:*.md" -g "!**/.git" -g "!**/bin" -g "!**/obj" -g "!**/node_modules" --type mmkkdd -- babel # 添加一个自定义的类型 myscript, 后缀名包含 *.ps1,*.cmd,*.bat, 排除.git、bin、obj、node_modules文件夹,搜索 dotnet rg --type-add "myscript:*.{ps1,cmd,bat}" -g "!**/.git" -g "!**/bin" -g "!**/obj" -g "!**/node_modules" --type myscript -- dotnet注意: 参数用引号包裹时,windows上用双引号 ", 类Unix 上用单引号 '。
文件检索相关命令行工具 BATA cat(1) clone with wings.特性:语法高亮Git 集成不可打印(non-printable)字符可视化自动分页fzfA command-line fuzzy finderfdA simple, fast and user-friendly alternative to 'find'ripgrep((rg))ripgrep recursively searches directories for a regex pattern while respecting your gitignoreripgrep 常用命令示例:# 查看支持的类型(type)列表 rg --type-list # 添加一个自定义的类型 mmkkdd, 后缀名为 *.md, 排除.git、bin、obj、node_modules文件夹,搜索 babel rg --type-add "mmkkdd:*.md" -g "!**/.git" -g "!**/bin" -g "!**/obj" -g "!**/node_modules" --type mmkkdd -- babel # 添加一个自定义的类型 myscript, 后缀名包含 *.ps1,*.cmd,*.bat, 排除.git、bin、obj、node_modules文件夹,搜索 dotnet rg --type-add "myscript:*.{ps1,cmd,bat}" -g "!**/.git" -g "!**/bin" -g "!**/obj" -g "!**/node_modules" --type myscript -- dotnet注意: 参数用引号包裹时,windows上用双引号 ", 类Unix 上用单引号 '。 -
![nvm替代者——fnm]() nvm替代者——fnm fnm 介绍Schniz/fnmGitHub描述: Fast and simple Node.js version manager, built in Rust自译: Rust实现的,迅捷而简单的Node.js版本管理器。fnm 特性nvm 只支持类 Unix 系统,而 fnm 跨平台支持更好,在 macOS、Windows、Linux 均可使用。可完全替代 nvm, fnm 支持 .node-version 和 .nvmrc 文件。fnm 安装macOS: brew install fnmWindows: scoop install fnm 或 choco install fnmLinux: 在 Releases 页面 下载压缩包,解压后将路径添加到环境变量PATH, 这种方式对 macOS 和 Windows 也适用macOS 和 Linux 还支持脚本安装: curl -fsSL https://fnm.vercel.app/install | bashfnm 使用fnm help 可查看帮助和详细命令Windows上临时使用fnm(持久化不修改环境变量)前往 fnm release 页面下载最新的 fnm-windows.zip解压后得到 fnm.exe (假设解压目录为 D:\portable\fnm)cmd.exe 中执行如下命令, 生成 fnm 设置环境变量的脚本 init.cmdfnm --fnm-dir "D:\portable\fnm" --node-dist-mirror "https://npmmirror.com/mirrors/node/" env --use-on-cd>init.cmd执行 init.cmd 后, 查找 node 版本列表, 安装合适的版本(以 v22.1.0 为例)fnm list-remote fnm install v22.1.0 fnm use v22.1.0至此,fnm 已经安装 好了 node, 接下来设置 npm 加速npm config -g set registry https://registry.npmmirror.com因为安装 pnpmnpm install -g pnpm参考https://npmmirror.com/Shell Setup - Windows Command Prompt aka Batch aka WinCMD
nvm替代者——fnm fnm 介绍Schniz/fnmGitHub描述: Fast and simple Node.js version manager, built in Rust自译: Rust实现的,迅捷而简单的Node.js版本管理器。fnm 特性nvm 只支持类 Unix 系统,而 fnm 跨平台支持更好,在 macOS、Windows、Linux 均可使用。可完全替代 nvm, fnm 支持 .node-version 和 .nvmrc 文件。fnm 安装macOS: brew install fnmWindows: scoop install fnm 或 choco install fnmLinux: 在 Releases 页面 下载压缩包,解压后将路径添加到环境变量PATH, 这种方式对 macOS 和 Windows 也适用macOS 和 Linux 还支持脚本安装: curl -fsSL https://fnm.vercel.app/install | bashfnm 使用fnm help 可查看帮助和详细命令Windows上临时使用fnm(持久化不修改环境变量)前往 fnm release 页面下载最新的 fnm-windows.zip解压后得到 fnm.exe (假设解压目录为 D:\portable\fnm)cmd.exe 中执行如下命令, 生成 fnm 设置环境变量的脚本 init.cmdfnm --fnm-dir "D:\portable\fnm" --node-dist-mirror "https://npmmirror.com/mirrors/node/" env --use-on-cd>init.cmd执行 init.cmd 后, 查找 node 版本列表, 安装合适的版本(以 v22.1.0 为例)fnm list-remote fnm install v22.1.0 fnm use v22.1.0至此,fnm 已经安装 好了 node, 接下来设置 npm 加速npm config -g set registry https://registry.npmmirror.com因为安装 pnpmnpm install -g pnpm参考https://npmmirror.com/Shell Setup - Windows Command Prompt aka Batch aka WinCMD -
![Ubuntu上nvm和最新版本nodejs(加速)安装]() Ubuntu上nvm和最新版本nodejs(加速)安装 操作-- 下载nvm安装脚本 wget -c -O nvm-install.sh https://ghproxy.com/https://raw.githubusercontent.com/nvm-sh/nvm/v0.39.1/install.sh -- 将nvm-install.sh中的下载链接前添加 https://ghproxy/ 安装nvm bash nvm-install.sh # 重新加载 ~/.bashrc, 使nvm命令可用 source ~/.bashrc # 设置nodejs国内源 export NVM_NODEJS_ORG_MIRROR=https://npmmirror.com/mirrors/node/ # 安装nodejs nvm install --ltsnvm-install.sh修改Diff@@ -59,14 +59,14 @@ nvm_source() { local NVM_SOURCE_URL NVM_SOURCE_URL="$NVM_SOURCE" if [ "_$NVM_METHOD" = "_script-nvm-exec" ]; then - NVM_SOURCE_URL="https://raw.githubusercontent.com/${NVM_GITHUB_REPO}/${NVM_VERSION}/nvm-exec" + NVM_SOURCE_URL="https://ghproxy.com/https://raw.githubusercontent.com/${NVM_GITHUB_REPO}/${NVM_VERSION}/nvm-exec" elif [ "_$NVM_METHOD" = "_script-nvm-bash-completion" ]; then - NVM_SOURCE_URL="https://raw.githubusercontent.com/${NVM_GITHUB_REPO}/${NVM_VERSION}/bash_completion" + NVM_SOURCE_URL="https://ghproxy.com/https://raw.githubusercontent.com/${NVM_GITHUB_REPO}/${NVM_VERSION}/bash_completion" elif [ -z "$NVM_SOURCE_URL" ]; then if [ "_$NVM_METHOD" = "_script" ]; then - NVM_SOURCE_URL="https://raw.githubusercontent.com/${NVM_GITHUB_REPO}/${NVM_VERSION}/nvm.sh" + NVM_SOURCE_URL="https://ghproxy.com/https://raw.githubusercontent.com/${NVM_GITHUB_REPO}/${NVM_VERSION}/nvm.sh" elif [ "_$NVM_METHOD" = "_git" ] || [ -z "$NVM_METHOD" ]; then - NVM_SOURCE_URL="https://github.com/${NVM_GITHUB_REPO}.git" + NVM_SOURCE_URL="https://ghproxy.com/https://github.com/${NVM_GITHUB_REPO}.git" else nvm_echo >&2 "Unexpected value \"$NVM_METHOD\" for \$NVM_METHOD" return 1
Ubuntu上nvm和最新版本nodejs(加速)安装 操作-- 下载nvm安装脚本 wget -c -O nvm-install.sh https://ghproxy.com/https://raw.githubusercontent.com/nvm-sh/nvm/v0.39.1/install.sh -- 将nvm-install.sh中的下载链接前添加 https://ghproxy/ 安装nvm bash nvm-install.sh # 重新加载 ~/.bashrc, 使nvm命令可用 source ~/.bashrc # 设置nodejs国内源 export NVM_NODEJS_ORG_MIRROR=https://npmmirror.com/mirrors/node/ # 安装nodejs nvm install --ltsnvm-install.sh修改Diff@@ -59,14 +59,14 @@ nvm_source() { local NVM_SOURCE_URL NVM_SOURCE_URL="$NVM_SOURCE" if [ "_$NVM_METHOD" = "_script-nvm-exec" ]; then - NVM_SOURCE_URL="https://raw.githubusercontent.com/${NVM_GITHUB_REPO}/${NVM_VERSION}/nvm-exec" + NVM_SOURCE_URL="https://ghproxy.com/https://raw.githubusercontent.com/${NVM_GITHUB_REPO}/${NVM_VERSION}/nvm-exec" elif [ "_$NVM_METHOD" = "_script-nvm-bash-completion" ]; then - NVM_SOURCE_URL="https://raw.githubusercontent.com/${NVM_GITHUB_REPO}/${NVM_VERSION}/bash_completion" + NVM_SOURCE_URL="https://ghproxy.com/https://raw.githubusercontent.com/${NVM_GITHUB_REPO}/${NVM_VERSION}/bash_completion" elif [ -z "$NVM_SOURCE_URL" ]; then if [ "_$NVM_METHOD" = "_script" ]; then - NVM_SOURCE_URL="https://raw.githubusercontent.com/${NVM_GITHUB_REPO}/${NVM_VERSION}/nvm.sh" + NVM_SOURCE_URL="https://ghproxy.com/https://raw.githubusercontent.com/${NVM_GITHUB_REPO}/${NVM_VERSION}/nvm.sh" elif [ "_$NVM_METHOD" = "_git" ] || [ -z "$NVM_METHOD" ]; then - NVM_SOURCE_URL="https://github.com/${NVM_GITHUB_REPO}.git" + NVM_SOURCE_URL="https://ghproxy.com/https://github.com/${NVM_GITHUB_REPO}.git" else nvm_echo >&2 "Unexpected value \"$NVM_METHOD\" for \$NVM_METHOD" return 1 -
![虚拟组网工具n2n源码编译记录]()
-
![Ubuntu使用minikube搭建K8S环境]() Ubuntu使用minikube搭建K8S环境 操作记录安装docker# 清理旧的docker(如果安装过的话) sudo apt-get remove docker docker-engine docker.io containerd runc # 安装需要的基础软件(一般都已经存在了) sudo apt-get install ca-certificates curl gnupg lsb-release # 添加GPG curl -fsSL https://download.docker.com/linux/ubuntu/gpg | sudo gpg --dearmor -o /etc/apt/keyrings/docker.gpg # 添加apt源 echo "deb [arch=$(dpkg --print-architecture) signed-by=/etc/apt/keyrings/docker.gpg] https://download.docker.com/linux/ubuntu $(lsb_release -cs) stable" | sudo tee /etc/apt/sources.list.d/docker.list > /dev/null # 更新本地apt源信息 sudo apt-get update # 安装 sudo apt-get install docker-ce docker-ce-cli containerd.io docker-compose-plugin -y # 将当前用户添加到docker组 sudo usermod -aG docker $USER # 登录到docker组 newgrp docker # 验证 docker run hello-world安装 kubectl# 安装 sudo snap install kubectl --classic # 验证 kubectl version --client安装并启动minikube# 下载 wget -c https://ghproxy.com/https://github.com/kubernetes/minikube/releases/download/v1.25.2/minikube_1.25.2-0_amd64.deb # 安装 sudo dpkg -i minikube_1.25.2-0_amd64.deb rm minikube_1.25.2-0_amd64.deb # 设置使用docker作为驱动 minikube config set driver docker # 启动minikube集群 minikube start --driver=docker --image-mirror-country='cn'配置minikube仪表盘(监听127.0.0.1只能本机访问)以supervisor为例, 如果未安装,请用命令sudo apt install supervisor 安装。minikube dashboard 配置sudo vim /etc/supervisor/conf.d/minikube_dashboard.conf/etc/supervisor/conf.d/minikube_dashboard.conf:[program:minikube_dashboard] user=xxx directory=/home/xxx command=/usr/bin/minikube dashboard --url autostart=true autorestart=true startsecs=5 stopsignal=HUP stopasgroup=true stopwaitsecs=5 stdout_logfile_maxbytes=20MB stdout_logfile=/var/log/supervisor/%(program_name)s-out.log stderr_logfile_maxbytes=20MB stderr_logfile=/var/log/supervisor/%(program_name)s-err.logkubectl proxy 配置(开放端口允许外部访问)sudo vim /etc/supervisor/conf.d/kubectl_proxy.confsudo vim /etc/supervisor/conf.d/kubectl_proxy.conf:[program:kubectl_proxy] user=xxx directory=/home/xxx command=/snap/bin/kubectl proxy --port=8090 --address=0.0.0.0 --accept-hosts='.*' autostart=true autorestart=true startsecs=5 stopsignal=HUP stopasgroup=true stopwaitsecs=5 stdout_logfile_maxbytes=20MB stdout_logfile=/var/log/supervisor/%(program_name)s-out.log stderr_logfile_maxbytes=20MB stderr_logfile=/var/log/supervisor/%(program_name)s-err.log启动dashboard# 进入 supervisor sudo supervisorctlsupervisorctl内操作# 应用配置更新 update # 查看minikube dashboard输出 tail -f minikube_dashboardminikube_dashboard输出如下:supervisor> tail -f minikube_dashboard ==> Press Ctrl-C to exit <== - Using image kubernetesui/metrics-scraper:v1.0.7 - Using image kubernetesui/dashboard:v2.3.1 http://127.0.0.1:42213/api/v1/namespaces/kubernetes-dashboard/services/http:kubernetes-dashboard:/proxy/复制url, 将其中的ip换为机器ip(假设为192.168.1.3), 端口换为代理端口(此处为8090), 即可实现外部访问:http://192.168.1.3:8090/api/v1/namespaces/kubernetes-dashboard/services/http:kubernetes-dashboard:/proxy/参考Install Docker Engine on UbuntuMinikube - Kubernetes本地实验环境minikube startdockerGitHub Proxy 代理加速
Ubuntu使用minikube搭建K8S环境 操作记录安装docker# 清理旧的docker(如果安装过的话) sudo apt-get remove docker docker-engine docker.io containerd runc # 安装需要的基础软件(一般都已经存在了) sudo apt-get install ca-certificates curl gnupg lsb-release # 添加GPG curl -fsSL https://download.docker.com/linux/ubuntu/gpg | sudo gpg --dearmor -o /etc/apt/keyrings/docker.gpg # 添加apt源 echo "deb [arch=$(dpkg --print-architecture) signed-by=/etc/apt/keyrings/docker.gpg] https://download.docker.com/linux/ubuntu $(lsb_release -cs) stable" | sudo tee /etc/apt/sources.list.d/docker.list > /dev/null # 更新本地apt源信息 sudo apt-get update # 安装 sudo apt-get install docker-ce docker-ce-cli containerd.io docker-compose-plugin -y # 将当前用户添加到docker组 sudo usermod -aG docker $USER # 登录到docker组 newgrp docker # 验证 docker run hello-world安装 kubectl# 安装 sudo snap install kubectl --classic # 验证 kubectl version --client安装并启动minikube# 下载 wget -c https://ghproxy.com/https://github.com/kubernetes/minikube/releases/download/v1.25.2/minikube_1.25.2-0_amd64.deb # 安装 sudo dpkg -i minikube_1.25.2-0_amd64.deb rm minikube_1.25.2-0_amd64.deb # 设置使用docker作为驱动 minikube config set driver docker # 启动minikube集群 minikube start --driver=docker --image-mirror-country='cn'配置minikube仪表盘(监听127.0.0.1只能本机访问)以supervisor为例, 如果未安装,请用命令sudo apt install supervisor 安装。minikube dashboard 配置sudo vim /etc/supervisor/conf.d/minikube_dashboard.conf/etc/supervisor/conf.d/minikube_dashboard.conf:[program:minikube_dashboard] user=xxx directory=/home/xxx command=/usr/bin/minikube dashboard --url autostart=true autorestart=true startsecs=5 stopsignal=HUP stopasgroup=true stopwaitsecs=5 stdout_logfile_maxbytes=20MB stdout_logfile=/var/log/supervisor/%(program_name)s-out.log stderr_logfile_maxbytes=20MB stderr_logfile=/var/log/supervisor/%(program_name)s-err.logkubectl proxy 配置(开放端口允许外部访问)sudo vim /etc/supervisor/conf.d/kubectl_proxy.confsudo vim /etc/supervisor/conf.d/kubectl_proxy.conf:[program:kubectl_proxy] user=xxx directory=/home/xxx command=/snap/bin/kubectl proxy --port=8090 --address=0.0.0.0 --accept-hosts='.*' autostart=true autorestart=true startsecs=5 stopsignal=HUP stopasgroup=true stopwaitsecs=5 stdout_logfile_maxbytes=20MB stdout_logfile=/var/log/supervisor/%(program_name)s-out.log stderr_logfile_maxbytes=20MB stderr_logfile=/var/log/supervisor/%(program_name)s-err.log启动dashboard# 进入 supervisor sudo supervisorctlsupervisorctl内操作# 应用配置更新 update # 查看minikube dashboard输出 tail -f minikube_dashboardminikube_dashboard输出如下:supervisor> tail -f minikube_dashboard ==> Press Ctrl-C to exit <== - Using image kubernetesui/metrics-scraper:v1.0.7 - Using image kubernetesui/dashboard:v2.3.1 http://127.0.0.1:42213/api/v1/namespaces/kubernetes-dashboard/services/http:kubernetes-dashboard:/proxy/复制url, 将其中的ip换为机器ip(假设为192.168.1.3), 端口换为代理端口(此处为8090), 即可实现外部访问:http://192.168.1.3:8090/api/v1/namespaces/kubernetes-dashboard/services/http:kubernetes-dashboard:/proxy/参考Install Docker Engine on UbuntuMinikube - Kubernetes本地实验环境minikube startdockerGitHub Proxy 代理加速