搜索到
35
篇与
的结果
-
![GoLang使用本地文件夹包]() GoLang使用本地文件夹包 操作记录# 创建目录 mkdir my-app cd my-app # 初始化go mod【重点1】 go mod init myapp # 创建文件 touch main.go # 【重点2-1】 mkdir demos touch demos/hello.go # 编译 go build -o myapp main.go # 运行 ./myapp文件结构如下./my-app/ ├── demos │ └── hello.go ├── go.mod └── main.go文件内容如下生成的go.modmodule myapp go 1.16demos/hello.go// 【重点2-2】 package demos import ( "fmt" ) func sayHi() { fmt.Println("Hi go mod") } // // 【重点4】 func HelloWorld() { fmt.Println("Hello World") }main.gopackage main // 【重点3】 import "myapp/demos" func main() { demos.HelloWorld() }重点说明【重点1】: 初始化go mod时,指定项目名(示例中为myapp, 与项目所在文件夹名my-app无关)【重点2-1】: 创建文件夹(确定了包名)【重点2-2】: 模块内声明package名(示例中为demos)【重点3】: import使用时, 导入格式为 "<项目名>/<模块名>"(多级包<模块名>按层级嵌套即可)【重点4】: 供包外部使用的成员必须是可导出的(即必须大写字母开头)
GoLang使用本地文件夹包 操作记录# 创建目录 mkdir my-app cd my-app # 初始化go mod【重点1】 go mod init myapp # 创建文件 touch main.go # 【重点2-1】 mkdir demos touch demos/hello.go # 编译 go build -o myapp main.go # 运行 ./myapp文件结构如下./my-app/ ├── demos │ └── hello.go ├── go.mod └── main.go文件内容如下生成的go.modmodule myapp go 1.16demos/hello.go// 【重点2-2】 package demos import ( "fmt" ) func sayHi() { fmt.Println("Hi go mod") } // // 【重点4】 func HelloWorld() { fmt.Println("Hello World") }main.gopackage main // 【重点3】 import "myapp/demos" func main() { demos.HelloWorld() }重点说明【重点1】: 初始化go mod时,指定项目名(示例中为myapp, 与项目所在文件夹名my-app无关)【重点2-1】: 创建文件夹(确定了包名)【重点2-2】: 模块内声明package名(示例中为demos)【重点3】: import使用时, 导入格式为 "<项目名>/<模块名>"(多级包<模块名>按层级嵌套即可)【重点4】: 供包外部使用的成员必须是可导出的(即必须大写字母开头) -
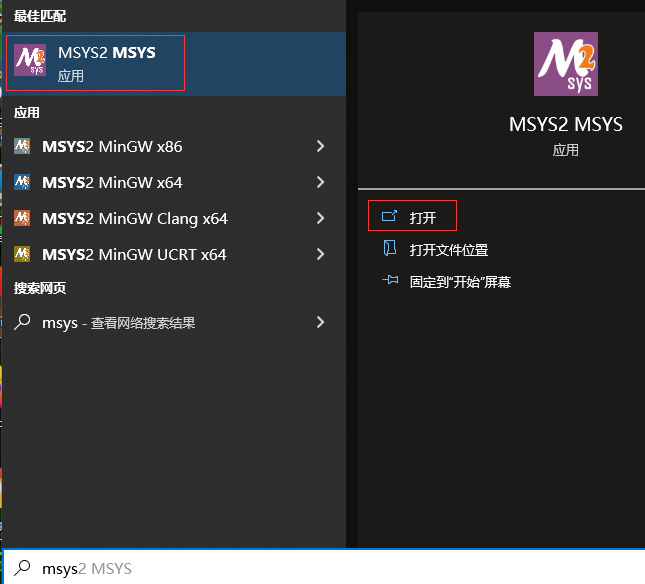
![基于msys2环境编译winpty]() 基于msys2环境编译winpty 操作记录安装msys2 根据msys2官方下载页面 MSYS2-Installation - MSYS2 的链接,打开下载列表页面(不同架构列表页面不同):32位: https://repo.msys2.org/distrib/i686/64位: https://repo.msys2.org/distrib/x86_64/ 在列表页面查找最新的exe文件,一般可从最底部倒序向上找(eg: msys2-x86_64-20220118.exe): 下载后选择路径安装(eg: D:\installed\msys64) 基本不需要太多设置,全部 下一步 即可。安装完成后将msys安装路径和bin目录添加到环境变量PATH: D:\installed\msys64;D:\installed\msys64\usr\bin安装编译需要的组件 打开MSYS2终端 操作如下:# 更新本地-系统包信息 pacman -Suu # 更新本地-安装的额外包信息 pacman -Syu # 安装msys/gcc pacman -S msys/gcc # 安装mingw64 pacman -S mingw64/mingw-w64-x86_64-gcc # 安装make pacman -S make # 临时将mingw64添加到环境变量 export PATH=$PATH:/mingw64/bin/克隆winpty源码到某个目录(eg: E:\github):git clone https://github.com.cnpmjs.org/rprichard/winpty.git则最终winpty完整目录为E:\github\winptyMSYS2终端进入winpty目录并编译# 注意Windows目录转换为MSYS2目录 cd /e/github/winpty # 预生产配置 # ./configure # 编译 make # 测试编译成功 ./build/winpty powershell # 资源管理器打开winpty的目录 explorer .部分截图记录:预生成配置: 开始编译: 编译完成: 测试: winpty目录下的build文件夹中即为编译好的文件
基于msys2环境编译winpty 操作记录安装msys2 根据msys2官方下载页面 MSYS2-Installation - MSYS2 的链接,打开下载列表页面(不同架构列表页面不同):32位: https://repo.msys2.org/distrib/i686/64位: https://repo.msys2.org/distrib/x86_64/ 在列表页面查找最新的exe文件,一般可从最底部倒序向上找(eg: msys2-x86_64-20220118.exe): 下载后选择路径安装(eg: D:\installed\msys64) 基本不需要太多设置,全部 下一步 即可。安装完成后将msys安装路径和bin目录添加到环境变量PATH: D:\installed\msys64;D:\installed\msys64\usr\bin安装编译需要的组件 打开MSYS2终端 操作如下:# 更新本地-系统包信息 pacman -Suu # 更新本地-安装的额外包信息 pacman -Syu # 安装msys/gcc pacman -S msys/gcc # 安装mingw64 pacman -S mingw64/mingw-w64-x86_64-gcc # 安装make pacman -S make # 临时将mingw64添加到环境变量 export PATH=$PATH:/mingw64/bin/克隆winpty源码到某个目录(eg: E:\github):git clone https://github.com.cnpmjs.org/rprichard/winpty.git则最终winpty完整目录为E:\github\winptyMSYS2终端进入winpty目录并编译# 注意Windows目录转换为MSYS2目录 cd /e/github/winpty # 预生产配置 # ./configure # 编译 make # 测试编译成功 ./build/winpty powershell # 资源管理器打开winpty的目录 explorer .部分截图记录:预生成配置: 开始编译: 编译完成: 测试: winpty目录下的build文件夹中即为编译好的文件 -
![Windows上常用(代码)编辑器推荐与抵制]() Windows上常用(代码)编辑器推荐与抵制 推荐除开 Sublime Text和Visual Studio Code等大众熟知的跨平台的软件之外,推荐一款Windows平台独有的编辑器,亦可代替系统内置的记事本(notepad)使用。Notepad3官网: https://www.rizonesoft.com/downloads/notepad3/github: https://github.com/rizonesoft/Notepad3Notepad2github: https://github.com/zufuliu/notepad2抵制程序员有国界, 犯我中华者虽远必诛。Nodepad++ 其官网News页面有多条release notes为刻意反华言论,仍在持续且毫无悔改道歉之意,故坚决抵制(包括但不限于 Github取关、卸载自己和同事电脑曾经安装的Notepad++同时安利替代工具)。
Windows上常用(代码)编辑器推荐与抵制 推荐除开 Sublime Text和Visual Studio Code等大众熟知的跨平台的软件之外,推荐一款Windows平台独有的编辑器,亦可代替系统内置的记事本(notepad)使用。Notepad3官网: https://www.rizonesoft.com/downloads/notepad3/github: https://github.com/rizonesoft/Notepad3Notepad2github: https://github.com/zufuliu/notepad2抵制程序员有国界, 犯我中华者虽远必诛。Nodepad++ 其官网News页面有多条release notes为刻意反华言论,仍在持续且毫无悔改道歉之意,故坚决抵制(包括但不限于 Github取关、卸载自己和同事电脑曾经安装的Notepad++同时安利替代工具)。 -
![.Net(C#)常用开源库]() .Net(C#)常用开源库 Actor框架名字开源地址NuGet主站点中文站点Proto.ActorAsynkronIT/protoactor-dotnetProto.Actorproto.actor Akka.NETakkadotnet/akka.netAkkagetakka.net Orleansdotnet/orleansMicrosoft.Orleans.Coredotnet.github.io/orleansorleans.azurewebsites.netactors-actorsvlingo-net/xoom-net-actorsVlingo.Xoom.Actors 网络库名字开源地址NuGet协议支持C/S端主站点SpanNettycuteant/SpanNettySpanNetty.HandlersTCP、UDP、HTTP、HTTP2、WebSocketC、S LiteNetLibRevenantX/LiteNetLibLiteNetLibRUDPC、Srevenantx.github.io/LiteNetLibTelepathyvis2k/TelepathyTelepathyTCPC、S NetCoreServerchronoxor/NetCoreServerNetCoreServerTCP、UDP、HTTP、WebSocketC、Schronoxor.github.io/NetCoreServerWatsonTcpjchristn/WatsonTcpWatsonTcpTCPC、S websocket-sharpsta/websocket-sharpWebSocketSharpWebSocketC、Ssta.github.io/websocket-sharpEmbedIOunosquare/embedioEmbedIOHttp、WebSocketSunosquare.github.io/embedio
.Net(C#)常用开源库 Actor框架名字开源地址NuGet主站点中文站点Proto.ActorAsynkronIT/protoactor-dotnetProto.Actorproto.actor Akka.NETakkadotnet/akka.netAkkagetakka.net Orleansdotnet/orleansMicrosoft.Orleans.Coredotnet.github.io/orleansorleans.azurewebsites.netactors-actorsvlingo-net/xoom-net-actorsVlingo.Xoom.Actors 网络库名字开源地址NuGet协议支持C/S端主站点SpanNettycuteant/SpanNettySpanNetty.HandlersTCP、UDP、HTTP、HTTP2、WebSocketC、S LiteNetLibRevenantX/LiteNetLibLiteNetLibRUDPC、Srevenantx.github.io/LiteNetLibTelepathyvis2k/TelepathyTelepathyTCPC、S NetCoreServerchronoxor/NetCoreServerNetCoreServerTCP、UDP、HTTP、WebSocketC、Schronoxor.github.io/NetCoreServerWatsonTcpjchristn/WatsonTcpWatsonTcpTCPC、S websocket-sharpsta/websocket-sharpWebSocketSharpWebSocketC、Ssta.github.io/websocket-sharpEmbedIOunosquare/embedioEmbedIOHttp、WebSocketSunosquare.github.io/embedio -
![Playwright使用记录]() Playwright使用记录 Playwright for .NET is the official language port of Playwright, the library to automate Chromium, Firefox and WebKit with a single API.操作记录# 安装 Playwright 工具 dotnet tool install --global Microsoft.Playwright.CLI # 创建项目 dotnet new console -n PlaywrightDemo cd PlaywrightDemo # 安装依赖 dotnet add package Microsoft.Playwright --prerelease # 用Playwright 工具安装浏览器 playwright install # chromium v888113 downloaded to C:\Users\gsw\AppData\Local\ms-playwright\chromium-888113 # firefox v1268 downloaded to C:\Users\gsw\AppData\Local\ms-playwright\firefox-1268 # webkit v1490 downloaded to C:\Users\gsw\AppData\Local\ms-playwright\webkit-1490 # ffmpeg v1005 downloaded to C:\Users\gsw\AppData\Local\ms-playwright\ffmpeg-1005 # 运行项目(PlaywrightDemo) dotnet run # 自动生成代码 playwright codegen # 打开指定页面(可调试或生成代码) playwright open https://gsw945.com/ # 以指定的语言、时区、和窗口大小,使用chromium浏览器打开指定页面,生成C#代码 playwright codegen --target csharp --browser chromium --channel chrome --lang "zh-CN" --timezone "Asia/Shanghai" --viewport-size "1920,1080" "https://gsw945.com/"代码示例using Microsoft.Playwright; using System; using System.Collections; using System.Collections.Generic; using System.IO; using System.Threading; using System.Threading.Tasks; class Program { /// <summary> /// 等待退出 /// </summary> private static ManualResetEvent waitQuitEvent = new ManualResetEvent(initialState: false); public static async Task Main() { // 设置调试相关环境变量 Environment.SetEnvironmentVariable("PWDEBUG", "console"); Environment.SetEnvironmentVariable("DEBUG", "pw:api"); var appDataLocal = Environment.GetFolderPath(Environment.SpecialFolder.LocalApplicationData); Console.WriteLine($"playwright下载浏览器目录: {Path.Combine(appDataLocal, "ms-playwright")}"); List<KeyValuePair<string, string>> envs = new List<KeyValuePair<string, string>>(); foreach (DictionaryEntry envItem in Environment.GetEnvironmentVariables()) { envs.Add(new KeyValuePair<string, string>((string)envItem.Key, (string)envItem.Value)); } // 创建playwright实例 using var playwright = await Playwright.CreateAsync(); // 创建Chromium浏览器实例 await using var browser = await playwright.Chromium.LaunchAsync(new BrowserTypeLaunchOptions() { Headless = false, // 关闭无头模式(有界面) Channel = "chrome", // 指定采用chrome浏览器类型 Devtools = true, // 启用开发者工具 ChromiumSandbox = false, // 关闭浏览器沙盒 Env = envs, // 环境变量 ExecutablePath = string.Empty, // 不指定浏览器可执行文件位置,会自动寻找 ms-playwright 下载的浏览器 }); browser.Disconnected += (object sender, IBrowser e) => { Console.WriteLine($"On Browser Close"); }; // 浏览器上下文 await using var context = await browser.NewContextAsync(new BrowserNewContextOptions { ViewportSize = new ViewportSize { Width = 1536, // 1920 * 0.8 Height = 864, // 1080 * 0.8 }, // 视口大小 Locale = "zh-CN", // 语言(区域) TimezoneId = "Asia/Shanghai", // 时区 }); context.Close += (object sender, IBrowserContext e) => { Console.WriteLine($"On Context Close"); }; // 新开页面(空白页) var page = await context.NewPageAsync(); // var page = await browser.NewPageAsync(); page.Close += (object sender, IPage e) => { Console.WriteLine($"On Page Close"); }; page.Dialog += async (_, dialog) => { Console.WriteLine(dialog.Message); await dialog.DismissAsync(); }; // 新开的页面跳转(打开)到指定URL await page.GotoAsync("https://gsw945.com/"); // await page.GotoAsync("https://playwright.dev/dotnet"); // 当前页面截图并保存到指定位置 var screenshotPath = Path.GetFullPath("screenshot.png"); await page.ScreenshotAsync(new PageScreenshotOptions { Path = screenshotPath, FullPage = true, Type = ScreenshotType.Png, OmitBackground = true }); if (File.Exists(screenshotPath)) { Console.WriteLine($"页面截图: {screenshotPath}"); // File.Delete(screenshotPath); } // (通过css选择器选择)点击指定的元素(如果元素还未出现在DOM中则等待) // refer: https://playwright.dev/dotnet/docs/core-concepts#auto-waiting await page.ClickAsync("a[title=\"友情链接\"]"); // (通过css选择器选择)等待元素出现在DOM中 await page.WaitForSelectorAsync("#Joe_Baidu_Record"); // 执行javascript表达式并取得结果 // refer: https://playwright.dev/dotnet/docs/core-concepts#execution-contexts-playwright-and-browser var href = await page.EvaluateAsync<string>("document.location.href"); Console.WriteLine($"href: {href}"); // 普通逻辑, 等待console退出 await StartWait2Exit(context); } public static async Task StartWait2Exit(IBrowserContext context) { Console.WriteLine("-".PadLeft(60, '-')); Console.WriteLine("Press [Ctrl + C] or [Q] or [Esc] to quit..."); Console.WriteLine("-".PadLeft(60, '-')); // Ctrl + C 捕获 Console.CancelKeyPress += (object sender, ConsoleCancelEventArgs eventArgs) => { eventArgs.Cancel = true; Console.WriteLine("[Ctrl + C] pressed, to quit."); waitQuitEvent.Set(); }; Thread t = new Thread(() => { while(true) { // 监听是否关闭了浏览器(playwright 断开连接 或 所有打开的页面全部都关闭了) if (!context.Browser.IsConnected || context.Pages.Count < 1) { Console.WriteLine("Detect Browser Context Is Not Connected or No Page is Open"); } // 如果输入输出未重定向 if (!Console.IsInputRedirected && Console.KeyAvailable) { // 读取键盘输入 ConsoleKeyInfo keyInfo = Console.ReadKey(intercept: true); Console.WriteLine($"Key: {keyInfo.Key}"); // Q或ESC键,退出 if (keyInfo.Key == ConsoleKey.Q || keyInfo.Key == ConsoleKey.Escape) { break; } } Thread.Sleep(millisecondsTimeout: 50); } waitQuitEvent.Set(); }); t.IsBackground = true; t.Start(); waitQuitEvent.WaitOne(); await Task.Yield(); } }参考Getting Started | PlaywrightDebugging toolsPlaywright for .NETPlaywrightBrowserBrowserContextPagePage.ScreenshotAsync(options)Page.WaitForSelectorAsync(selector, options)https://github.com/microsoft/playwrighthttps://github.com/microsoft/playwright-dotnet
Playwright使用记录 Playwright for .NET is the official language port of Playwright, the library to automate Chromium, Firefox and WebKit with a single API.操作记录# 安装 Playwright 工具 dotnet tool install --global Microsoft.Playwright.CLI # 创建项目 dotnet new console -n PlaywrightDemo cd PlaywrightDemo # 安装依赖 dotnet add package Microsoft.Playwright --prerelease # 用Playwright 工具安装浏览器 playwright install # chromium v888113 downloaded to C:\Users\gsw\AppData\Local\ms-playwright\chromium-888113 # firefox v1268 downloaded to C:\Users\gsw\AppData\Local\ms-playwright\firefox-1268 # webkit v1490 downloaded to C:\Users\gsw\AppData\Local\ms-playwright\webkit-1490 # ffmpeg v1005 downloaded to C:\Users\gsw\AppData\Local\ms-playwright\ffmpeg-1005 # 运行项目(PlaywrightDemo) dotnet run # 自动生成代码 playwright codegen # 打开指定页面(可调试或生成代码) playwright open https://gsw945.com/ # 以指定的语言、时区、和窗口大小,使用chromium浏览器打开指定页面,生成C#代码 playwright codegen --target csharp --browser chromium --channel chrome --lang "zh-CN" --timezone "Asia/Shanghai" --viewport-size "1920,1080" "https://gsw945.com/"代码示例using Microsoft.Playwright; using System; using System.Collections; using System.Collections.Generic; using System.IO; using System.Threading; using System.Threading.Tasks; class Program { /// <summary> /// 等待退出 /// </summary> private static ManualResetEvent waitQuitEvent = new ManualResetEvent(initialState: false); public static async Task Main() { // 设置调试相关环境变量 Environment.SetEnvironmentVariable("PWDEBUG", "console"); Environment.SetEnvironmentVariable("DEBUG", "pw:api"); var appDataLocal = Environment.GetFolderPath(Environment.SpecialFolder.LocalApplicationData); Console.WriteLine($"playwright下载浏览器目录: {Path.Combine(appDataLocal, "ms-playwright")}"); List<KeyValuePair<string, string>> envs = new List<KeyValuePair<string, string>>(); foreach (DictionaryEntry envItem in Environment.GetEnvironmentVariables()) { envs.Add(new KeyValuePair<string, string>((string)envItem.Key, (string)envItem.Value)); } // 创建playwright实例 using var playwright = await Playwright.CreateAsync(); // 创建Chromium浏览器实例 await using var browser = await playwright.Chromium.LaunchAsync(new BrowserTypeLaunchOptions() { Headless = false, // 关闭无头模式(有界面) Channel = "chrome", // 指定采用chrome浏览器类型 Devtools = true, // 启用开发者工具 ChromiumSandbox = false, // 关闭浏览器沙盒 Env = envs, // 环境变量 ExecutablePath = string.Empty, // 不指定浏览器可执行文件位置,会自动寻找 ms-playwright 下载的浏览器 }); browser.Disconnected += (object sender, IBrowser e) => { Console.WriteLine($"On Browser Close"); }; // 浏览器上下文 await using var context = await browser.NewContextAsync(new BrowserNewContextOptions { ViewportSize = new ViewportSize { Width = 1536, // 1920 * 0.8 Height = 864, // 1080 * 0.8 }, // 视口大小 Locale = "zh-CN", // 语言(区域) TimezoneId = "Asia/Shanghai", // 时区 }); context.Close += (object sender, IBrowserContext e) => { Console.WriteLine($"On Context Close"); }; // 新开页面(空白页) var page = await context.NewPageAsync(); // var page = await browser.NewPageAsync(); page.Close += (object sender, IPage e) => { Console.WriteLine($"On Page Close"); }; page.Dialog += async (_, dialog) => { Console.WriteLine(dialog.Message); await dialog.DismissAsync(); }; // 新开的页面跳转(打开)到指定URL await page.GotoAsync("https://gsw945.com/"); // await page.GotoAsync("https://playwright.dev/dotnet"); // 当前页面截图并保存到指定位置 var screenshotPath = Path.GetFullPath("screenshot.png"); await page.ScreenshotAsync(new PageScreenshotOptions { Path = screenshotPath, FullPage = true, Type = ScreenshotType.Png, OmitBackground = true }); if (File.Exists(screenshotPath)) { Console.WriteLine($"页面截图: {screenshotPath}"); // File.Delete(screenshotPath); } // (通过css选择器选择)点击指定的元素(如果元素还未出现在DOM中则等待) // refer: https://playwright.dev/dotnet/docs/core-concepts#auto-waiting await page.ClickAsync("a[title=\"友情链接\"]"); // (通过css选择器选择)等待元素出现在DOM中 await page.WaitForSelectorAsync("#Joe_Baidu_Record"); // 执行javascript表达式并取得结果 // refer: https://playwright.dev/dotnet/docs/core-concepts#execution-contexts-playwright-and-browser var href = await page.EvaluateAsync<string>("document.location.href"); Console.WriteLine($"href: {href}"); // 普通逻辑, 等待console退出 await StartWait2Exit(context); } public static async Task StartWait2Exit(IBrowserContext context) { Console.WriteLine("-".PadLeft(60, '-')); Console.WriteLine("Press [Ctrl + C] or [Q] or [Esc] to quit..."); Console.WriteLine("-".PadLeft(60, '-')); // Ctrl + C 捕获 Console.CancelKeyPress += (object sender, ConsoleCancelEventArgs eventArgs) => { eventArgs.Cancel = true; Console.WriteLine("[Ctrl + C] pressed, to quit."); waitQuitEvent.Set(); }; Thread t = new Thread(() => { while(true) { // 监听是否关闭了浏览器(playwright 断开连接 或 所有打开的页面全部都关闭了) if (!context.Browser.IsConnected || context.Pages.Count < 1) { Console.WriteLine("Detect Browser Context Is Not Connected or No Page is Open"); } // 如果输入输出未重定向 if (!Console.IsInputRedirected && Console.KeyAvailable) { // 读取键盘输入 ConsoleKeyInfo keyInfo = Console.ReadKey(intercept: true); Console.WriteLine($"Key: {keyInfo.Key}"); // Q或ESC键,退出 if (keyInfo.Key == ConsoleKey.Q || keyInfo.Key == ConsoleKey.Escape) { break; } } Thread.Sleep(millisecondsTimeout: 50); } waitQuitEvent.Set(); }); t.IsBackground = true; t.Start(); waitQuitEvent.WaitOne(); await Task.Yield(); } }参考Getting Started | PlaywrightDebugging toolsPlaywright for .NETPlaywrightBrowserBrowserContextPagePage.ScreenshotAsync(options)Page.WaitForSelectorAsync(selector, options)https://github.com/microsoft/playwrighthttps://github.com/microsoft/playwright-dotnet -
![Proto.Actor Bootcamp 学习笔记]() Proto.Actor Bootcamp 学习笔记 Proto.Actor Bootcamp一、介绍Actor模型和Proto.Actor1. 为何使用Actor模型源: Docs\Bootcamp\Unit 1\Lesson 1: Why use the actor model无需手动控制线程高级抽象垂直伸缩(扩大)水平伸缩(扩展)容错和错误处理常见的体系结构2. Actor模型适用的应用类型源: Docs\Bootcamp\Unit 1\Lesson 2: Types of applications for which actors are suitable.交易应用可分包的应用服务通信应用多人游戏交通管理数值处理物联网3. Proto.Actor在不同类型的应用中的使用源: Docs\Bootcamp\Unit 1\Lesson 3: Use of Proto.Actor in different types of applications.服务端服务后端(Web Api等)Web应用客户端控制台应用WPF应用4. 反应式编程宣言源: Docs\Bootcamp\Unit 1\Lesson 4: The Reactive ManifestoProto.Actor 遵循反应式编程宣言事件驱动弹性伸缩容错恢复响应性5. Proto.Actor的关键特性源: Docs\Bootcamp\Unit 1\Lesson 5: Key features of the Proto.Actor.并发和异步分布式处理高性能容错在单个应用程序使用多种编程语言的能力6. Actor和消息源: Docs\Bootcamp\Unit 1\Lesson 6: Actors and messages.Actor之间通过消息进行交互消息是异步的7. Proto.Actor中Actor是什么源: Docs\Bootcamp\Unit 1\Lesson 7: What’s an actor in Proto.Actor.一切都是Actor遵循 单一功能原则(Single responsibility principle)Actor功能接收消息并处理创建更多的Actor给其他Actor发消息改变状态以便可以处理后续消息Actor包括State 状态Behavior 行为对接收到的消息的处理Mailbox 信箱默认先入先出(FIFO)可用算法控制优先级Child actors 子级Actorcontext.actorOf (...) 创建context.stop (child) 停止Supervisor strategy 监管策略重启子级Actor,保持子级Actor的状态重启子级Actor,恢复子级Actor到标准状态停止子级Actor传递错误到父级Actor8. Proto.Actor中消息是什么源: Docs\Bootcamp\Unit 1\Lesson 8: What’s a message in Proto.Actor.Actor之间传递的数据(可以是普通的类)消息(在创建后)是不可变的消息是线程安全的9. Proto.Actor中Props、RootContext和ActorContext分别是什么源: Docs\Bootcamp\Unit 1\Lesson 9: What’re Props, RootContext, and ActorContext in Proto.Actor.RootContext 创建初始(顶级)Actor, 和应用系统中的Actor交互ActorContext 创建(普通, 非顶级)Actor, 和其他Actor交互, 存储Actor相关的数据Props 一个配置类, 设置创建Actor的参数10. Proto.Actor监管层级概述源: Docs\Bootcamp\Unit 1\Lesson 10: Overview of the supervisor hierarchy in Proto. Actor.错误处理自我修复11. 安装Proto.Actor源: Docs\Bootcamp\Unit 1\Lesson 11: Installing Proto.Actor.Proto. Actor 主要的NuGet包Proto.Schedulers.SimpleScheduler 调度消息(延迟发送或间隔重复发送等)Proto.Persistence.* 持久化Actor状态Proto.Remote 远程Proto.Cluster.* 集群Proto.OpenTracing 追踪和调试Actor二、 Actor和消息的定义和使用1. 定义Actor源: Docs\Bootcamp\Unit 2\Lesson 1: Defining Actors.一个继承自Proto.Actor的Actor基类的类定义可以处理的消息类型确保Actor的内部状态不会被其他Actor改变一个Actor的功能应该足够简单,如果太负责则应该拆分为单独的Actor注意Actor使用的计算资源和内存消耗2. Actor引用源: Docs\Bootcamp\Unit 2\Lesson 2: Actor References.PID 区分Actor, Actor的抽象层唯一增量分配Actor之间通过PID通信3. 定义消息源: Docs\Bootcamp\Unit 2\Lesson 3: Defining Messages.使用C#创建消息普通C#类类属性外部只读Protocol Buffers (protobuf)字段唯一编号1~536870911 取值区间19000~19999 保留值区间(内部使用)1~15 占用1个字节16~2047 占用2个字节option csharp_namespace 定义生成的C#代码的namespacepackage 防止消息定义命名冲突4. 发送消息的类型:源: Docs\Bootcamp\Unit 2\Lesson 4: Types of Message Sending.Send() 发送消息, 无需等待响应, 性能消耗小RequestAsync() 发送消息, 等待响应, 可设置等待超时Forward() 转发收到的消息到其他Actor5. Actor实例化:源: Docs\Bootcamp\Unit 2\Lesson 5: Actor Instantiation.6. 定义Actor将要处理的消息:源: Docs\Bootcamp\Unit 2\Lesson 6: Defining Which Messages an Actor will processing.7. 发送自定义消息:源: Docs\Bootcamp\Unit 2\Lesson 7: Sending a Custom Message.三、 理解Actor的生命周期和状态1. Actor生命周期源: Docs\Bootcamp\Unit 3\Lesson 1: Actor Lifecycle.Actor生命周期状态Starting ProcessMessageAsync()Receiving MessagesStopping产生原因:调用 ActorContext.Stop() 或 ActorContext.StopAsync()子级Actor出现错误,父级Actor会发送停止消息给它状态拆分:Stopping 收到Stop消息, 准备停止Stop Actor已停止, 使用的资源已释放Restarting 停止之后, 收到Restart消息Terminated 收到Terminated消息, 不再接受任何消息, 不能被重新加载2. Actor生命周期消息源: Docs\Bootcamp\Unit 3\Lesson 2: Actor Lifecycle Messages.3. 终止Actor和Actor的层次结构源: Docs\Bootcamp\Unit 3\Lesson 3: Terminating Actors and Hierarchy of Actors.4. PoisonPill消息及其用法源: Docs\Bootcamp\Unit 3\Lesson 4: What is the Poison Pill message and how to work with it.5. 可切换的Actor行为源: Docs\Bootcamp\Unit 3\Lesson 5: Switchable Actor Behavior.Behavior 运行时动态修改Actor的行为Become() 清空行为栈,添加行为BecomeStacked() 不清空行为栈,追加行为ReceiveAsync(context) 消息处理6. 使用行为切换重构源: Docs\Bootcamp\Unit 3\Lesson 6: Refactoring with using behavior switching.四、 创建Actor层级和错误处理1. 监控和Actor层级源: Docs\Bootcamp\Unit 4\Lesson 1: Supervisor and actor hierarchy.system.Root.Spawn(props); 创建顶级(Actor)Actorcontext.Spawn(props); 创建子级Actor2. 演示监控者的能力和Actor层级的应用概览源: Docs\Bootcamp\Unit 4\Lesson 2: Overview of the application that demonstrates the supervisor’s capabilities and the actors hierarchy.3. Actor的地址和PID源: Docs\Bootcamp\Unit 4\Lesson 3: Actor’s address and PID.$"{system.ProcessRegistry.NextId()}/{name}" PID格式var moviePlayCounterActorPid = new PID(system.ProcessRegistry.Address, "$1/MoviePlayCounterActor"); 手动创建PID4. 创建 UserCoordinatorActor源: Docs\Bootcamp\Unit 4\Lesson 4: Creating UserCoordinatorActor.5. 创建 MoviePlayCounterActor源: Docs\Bootcamp\Unit 4\Lesson 5: Creating MoviePlayCounterActor.6. 父级Actor如何监管他们的子级Actor源: Docs\Bootcamp\Unit 4\Lesson 6: How parent actors are watching over their children actors.继续处理(忽略错误)重启完全停止委托上层Actor处理7. 控制子级Actor的策略源: Docs\Bootcamp\Unit 4\Lesson 7: Strategies to control the state of children’s actors.WithChildSupervisorStrategy() 重写子级Actor监控策略public delegate SupervisorDirective Decider(PID pid, Exception reason); Decider委托OneForOneStrategy 仅仅产生异常的子级Actor会执行从Decider()方法收到的指令(Directive)AllForOneStrategy 所有的子级Actor都会执行从Decider()方法收到的指令(Directive)五、 消息路由使用路由控制消息流:性能 (使用Proto.Actor路由)消息内容 (使用常规Actor)状态1. 路由模式源: Docs\Bootcamp\Unit 5\Lesson 1: Router pattern.性能收到不同内容的消息取决于路由的状态2. 利用Proto.Actor路由负载均衡源: Docs\Bootcamp\Unit 5\Lesson 2: Load balancing with Proto.Actor routers.两种内置路由类型:Pool 负责Actor的创建和完成后的移除,是Actor的父级ActorGroup 不参与Actor的创建,与Actor的层级结构无关几个内置路由:Round-robin 顺序发送消息到ActorHash key 消息携带地址Random 随机选择接收者Weighted round robin 和Round-robin类似,但支持为特定的接收者定制权重Broadcast 消息发给组里面的所有Actor3. 路由池源: Docs\Bootcamp\Unit 5\Lesson 3: Pool Router.路由创建远程路由 - 特殊消息:RouterAddRoutee 将本地Actor或远程Actor的PID添加到路由表中RouterRemoveRoutee 从路由表中移除PIDRouterGetRoutees 获取(当前路由器)使用的路由表Routees 包含当前(路由器的)路由表状态检测4. 路由组源: Docs\Bootcamp\Unit 5\Lesson 4: Group Router.组创建5. 一致性哈希路由源: Docs\Bootcamp\Unit 5\Lesson 5: ConsistentHashing Router.将消息(Message)转换为消息键(Message Key)对象。IHashable接口基于消息键(Message Key)创建散列码(Hash Code)根据哈希码(Hash Code)选择虚拟主机(Virtual host)发送消息到选择的虚拟主机6. 使用Actor实现路由模式源: Docs\Bootcamp\Unit 5\Lesson 6: Implementation of the router pattern with using actors.根据内容路由基于状态路由六、 消息通道1. 通道类型源: Docs\Bootcamp\Unit 6\Lesson 1: Channels Types.point-to-point, 连接发送者(sender)和接受者(recipient)publisher/subscriber, 可运行期间动态改变接受者,实现EventStream类2. 点对点通道源: Docs\Bootcamp\Unit 6\Lesson 2: Point-to-point Channel.每条消息只会发给某一个接收者发送者知道接收者3. 发布/订阅通道源: Docs\Bootcamp\Unit 6\Lesson 3: Publisher/Subscriber Channel.单条消息可以发送给多个接收者发送者不关心接收者是谁4. 事件流源: Docs\Bootcamp\Unit 6\Lesson 4: EventStream.Subscribe<T>()Unsubscribe()Publish(msg)5. 死信(无法投寄的信)源: Docs\Bootcamp\Unit 6\Lesson 5: DeadLetter Channel.6. 保证投递源: Docs\Bootcamp\Unit 6\Lesson 6: Guaranteed delivery.七、Proto.Actor远程1. 水平伸缩是什么源: Docs\Bootcamp\Unit 7\Lesson 1: What is horizontal scaling.典型网络拓扑Bus 总线Star 星形Ring 环形Mesh 网状Tree 树形Point-to-Point 点对点2. Proto.Actor远程概览源: Docs\Bootcamp\Unit 7\Lesson 2: Overview Proto.Actor Remote.Proto.Remote关键特性位置透明(Location transparency)远程创建(Remote spawning)gRPC流(gRPC Streams)3. Proto.Actor远程使用示例源: Docs\Bootcamp\Unit 7\Lesson 3: Example of working with Proto.Actor Remote.八、Proto.Actor集群1. 为什么你需要集群源: Docs\Bootcamp\Unit 8\Lesson 1: Why do you need clusters.2. 集群中的成员源: Docs\Bootcamp\Unit 8\Lesson 2: Membership in the cluster.3. 加入集群源: Docs\Bootcamp\Unit 8\Lesson 3: Joining to the cluster.分布式架构中,服务发现的功能集群中的元信息服务的一致性注册和监控组件可用性的机制组件发现的机制服务发现Proto.Cluster.ConsulProto.Cluster.SingleRemoteInstance4. 在集群中处理任务源: Docs\Bootcamp\Unit 8\Lesson 4: Processing tasks in the ClusterTODO: 学习记录, 此处继续
Proto.Actor Bootcamp 学习笔记 Proto.Actor Bootcamp一、介绍Actor模型和Proto.Actor1. 为何使用Actor模型源: Docs\Bootcamp\Unit 1\Lesson 1: Why use the actor model无需手动控制线程高级抽象垂直伸缩(扩大)水平伸缩(扩展)容错和错误处理常见的体系结构2. Actor模型适用的应用类型源: Docs\Bootcamp\Unit 1\Lesson 2: Types of applications for which actors are suitable.交易应用可分包的应用服务通信应用多人游戏交通管理数值处理物联网3. Proto.Actor在不同类型的应用中的使用源: Docs\Bootcamp\Unit 1\Lesson 3: Use of Proto.Actor in different types of applications.服务端服务后端(Web Api等)Web应用客户端控制台应用WPF应用4. 反应式编程宣言源: Docs\Bootcamp\Unit 1\Lesson 4: The Reactive ManifestoProto.Actor 遵循反应式编程宣言事件驱动弹性伸缩容错恢复响应性5. Proto.Actor的关键特性源: Docs\Bootcamp\Unit 1\Lesson 5: Key features of the Proto.Actor.并发和异步分布式处理高性能容错在单个应用程序使用多种编程语言的能力6. Actor和消息源: Docs\Bootcamp\Unit 1\Lesson 6: Actors and messages.Actor之间通过消息进行交互消息是异步的7. Proto.Actor中Actor是什么源: Docs\Bootcamp\Unit 1\Lesson 7: What’s an actor in Proto.Actor.一切都是Actor遵循 单一功能原则(Single responsibility principle)Actor功能接收消息并处理创建更多的Actor给其他Actor发消息改变状态以便可以处理后续消息Actor包括State 状态Behavior 行为对接收到的消息的处理Mailbox 信箱默认先入先出(FIFO)可用算法控制优先级Child actors 子级Actorcontext.actorOf (...) 创建context.stop (child) 停止Supervisor strategy 监管策略重启子级Actor,保持子级Actor的状态重启子级Actor,恢复子级Actor到标准状态停止子级Actor传递错误到父级Actor8. Proto.Actor中消息是什么源: Docs\Bootcamp\Unit 1\Lesson 8: What’s a message in Proto.Actor.Actor之间传递的数据(可以是普通的类)消息(在创建后)是不可变的消息是线程安全的9. Proto.Actor中Props、RootContext和ActorContext分别是什么源: Docs\Bootcamp\Unit 1\Lesson 9: What’re Props, RootContext, and ActorContext in Proto.Actor.RootContext 创建初始(顶级)Actor, 和应用系统中的Actor交互ActorContext 创建(普通, 非顶级)Actor, 和其他Actor交互, 存储Actor相关的数据Props 一个配置类, 设置创建Actor的参数10. Proto.Actor监管层级概述源: Docs\Bootcamp\Unit 1\Lesson 10: Overview of the supervisor hierarchy in Proto. Actor.错误处理自我修复11. 安装Proto.Actor源: Docs\Bootcamp\Unit 1\Lesson 11: Installing Proto.Actor.Proto. Actor 主要的NuGet包Proto.Schedulers.SimpleScheduler 调度消息(延迟发送或间隔重复发送等)Proto.Persistence.* 持久化Actor状态Proto.Remote 远程Proto.Cluster.* 集群Proto.OpenTracing 追踪和调试Actor二、 Actor和消息的定义和使用1. 定义Actor源: Docs\Bootcamp\Unit 2\Lesson 1: Defining Actors.一个继承自Proto.Actor的Actor基类的类定义可以处理的消息类型确保Actor的内部状态不会被其他Actor改变一个Actor的功能应该足够简单,如果太负责则应该拆分为单独的Actor注意Actor使用的计算资源和内存消耗2. Actor引用源: Docs\Bootcamp\Unit 2\Lesson 2: Actor References.PID 区分Actor, Actor的抽象层唯一增量分配Actor之间通过PID通信3. 定义消息源: Docs\Bootcamp\Unit 2\Lesson 3: Defining Messages.使用C#创建消息普通C#类类属性外部只读Protocol Buffers (protobuf)字段唯一编号1~536870911 取值区间19000~19999 保留值区间(内部使用)1~15 占用1个字节16~2047 占用2个字节option csharp_namespace 定义生成的C#代码的namespacepackage 防止消息定义命名冲突4. 发送消息的类型:源: Docs\Bootcamp\Unit 2\Lesson 4: Types of Message Sending.Send() 发送消息, 无需等待响应, 性能消耗小RequestAsync() 发送消息, 等待响应, 可设置等待超时Forward() 转发收到的消息到其他Actor5. Actor实例化:源: Docs\Bootcamp\Unit 2\Lesson 5: Actor Instantiation.6. 定义Actor将要处理的消息:源: Docs\Bootcamp\Unit 2\Lesson 6: Defining Which Messages an Actor will processing.7. 发送自定义消息:源: Docs\Bootcamp\Unit 2\Lesson 7: Sending a Custom Message.三、 理解Actor的生命周期和状态1. Actor生命周期源: Docs\Bootcamp\Unit 3\Lesson 1: Actor Lifecycle.Actor生命周期状态Starting ProcessMessageAsync()Receiving MessagesStopping产生原因:调用 ActorContext.Stop() 或 ActorContext.StopAsync()子级Actor出现错误,父级Actor会发送停止消息给它状态拆分:Stopping 收到Stop消息, 准备停止Stop Actor已停止, 使用的资源已释放Restarting 停止之后, 收到Restart消息Terminated 收到Terminated消息, 不再接受任何消息, 不能被重新加载2. Actor生命周期消息源: Docs\Bootcamp\Unit 3\Lesson 2: Actor Lifecycle Messages.3. 终止Actor和Actor的层次结构源: Docs\Bootcamp\Unit 3\Lesson 3: Terminating Actors and Hierarchy of Actors.4. PoisonPill消息及其用法源: Docs\Bootcamp\Unit 3\Lesson 4: What is the Poison Pill message and how to work with it.5. 可切换的Actor行为源: Docs\Bootcamp\Unit 3\Lesson 5: Switchable Actor Behavior.Behavior 运行时动态修改Actor的行为Become() 清空行为栈,添加行为BecomeStacked() 不清空行为栈,追加行为ReceiveAsync(context) 消息处理6. 使用行为切换重构源: Docs\Bootcamp\Unit 3\Lesson 6: Refactoring with using behavior switching.四、 创建Actor层级和错误处理1. 监控和Actor层级源: Docs\Bootcamp\Unit 4\Lesson 1: Supervisor and actor hierarchy.system.Root.Spawn(props); 创建顶级(Actor)Actorcontext.Spawn(props); 创建子级Actor2. 演示监控者的能力和Actor层级的应用概览源: Docs\Bootcamp\Unit 4\Lesson 2: Overview of the application that demonstrates the supervisor’s capabilities and the actors hierarchy.3. Actor的地址和PID源: Docs\Bootcamp\Unit 4\Lesson 3: Actor’s address and PID.$"{system.ProcessRegistry.NextId()}/{name}" PID格式var moviePlayCounterActorPid = new PID(system.ProcessRegistry.Address, "$1/MoviePlayCounterActor"); 手动创建PID4. 创建 UserCoordinatorActor源: Docs\Bootcamp\Unit 4\Lesson 4: Creating UserCoordinatorActor.5. 创建 MoviePlayCounterActor源: Docs\Bootcamp\Unit 4\Lesson 5: Creating MoviePlayCounterActor.6. 父级Actor如何监管他们的子级Actor源: Docs\Bootcamp\Unit 4\Lesson 6: How parent actors are watching over their children actors.继续处理(忽略错误)重启完全停止委托上层Actor处理7. 控制子级Actor的策略源: Docs\Bootcamp\Unit 4\Lesson 7: Strategies to control the state of children’s actors.WithChildSupervisorStrategy() 重写子级Actor监控策略public delegate SupervisorDirective Decider(PID pid, Exception reason); Decider委托OneForOneStrategy 仅仅产生异常的子级Actor会执行从Decider()方法收到的指令(Directive)AllForOneStrategy 所有的子级Actor都会执行从Decider()方法收到的指令(Directive)五、 消息路由使用路由控制消息流:性能 (使用Proto.Actor路由)消息内容 (使用常规Actor)状态1. 路由模式源: Docs\Bootcamp\Unit 5\Lesson 1: Router pattern.性能收到不同内容的消息取决于路由的状态2. 利用Proto.Actor路由负载均衡源: Docs\Bootcamp\Unit 5\Lesson 2: Load balancing with Proto.Actor routers.两种内置路由类型:Pool 负责Actor的创建和完成后的移除,是Actor的父级ActorGroup 不参与Actor的创建,与Actor的层级结构无关几个内置路由:Round-robin 顺序发送消息到ActorHash key 消息携带地址Random 随机选择接收者Weighted round robin 和Round-robin类似,但支持为特定的接收者定制权重Broadcast 消息发给组里面的所有Actor3. 路由池源: Docs\Bootcamp\Unit 5\Lesson 3: Pool Router.路由创建远程路由 - 特殊消息:RouterAddRoutee 将本地Actor或远程Actor的PID添加到路由表中RouterRemoveRoutee 从路由表中移除PIDRouterGetRoutees 获取(当前路由器)使用的路由表Routees 包含当前(路由器的)路由表状态检测4. 路由组源: Docs\Bootcamp\Unit 5\Lesson 4: Group Router.组创建5. 一致性哈希路由源: Docs\Bootcamp\Unit 5\Lesson 5: ConsistentHashing Router.将消息(Message)转换为消息键(Message Key)对象。IHashable接口基于消息键(Message Key)创建散列码(Hash Code)根据哈希码(Hash Code)选择虚拟主机(Virtual host)发送消息到选择的虚拟主机6. 使用Actor实现路由模式源: Docs\Bootcamp\Unit 5\Lesson 6: Implementation of the router pattern with using actors.根据内容路由基于状态路由六、 消息通道1. 通道类型源: Docs\Bootcamp\Unit 6\Lesson 1: Channels Types.point-to-point, 连接发送者(sender)和接受者(recipient)publisher/subscriber, 可运行期间动态改变接受者,实现EventStream类2. 点对点通道源: Docs\Bootcamp\Unit 6\Lesson 2: Point-to-point Channel.每条消息只会发给某一个接收者发送者知道接收者3. 发布/订阅通道源: Docs\Bootcamp\Unit 6\Lesson 3: Publisher/Subscriber Channel.单条消息可以发送给多个接收者发送者不关心接收者是谁4. 事件流源: Docs\Bootcamp\Unit 6\Lesson 4: EventStream.Subscribe<T>()Unsubscribe()Publish(msg)5. 死信(无法投寄的信)源: Docs\Bootcamp\Unit 6\Lesson 5: DeadLetter Channel.6. 保证投递源: Docs\Bootcamp\Unit 6\Lesson 6: Guaranteed delivery.七、Proto.Actor远程1. 水平伸缩是什么源: Docs\Bootcamp\Unit 7\Lesson 1: What is horizontal scaling.典型网络拓扑Bus 总线Star 星形Ring 环形Mesh 网状Tree 树形Point-to-Point 点对点2. Proto.Actor远程概览源: Docs\Bootcamp\Unit 7\Lesson 2: Overview Proto.Actor Remote.Proto.Remote关键特性位置透明(Location transparency)远程创建(Remote spawning)gRPC流(gRPC Streams)3. Proto.Actor远程使用示例源: Docs\Bootcamp\Unit 7\Lesson 3: Example of working with Proto.Actor Remote.八、Proto.Actor集群1. 为什么你需要集群源: Docs\Bootcamp\Unit 8\Lesson 1: Why do you need clusters.2. 集群中的成员源: Docs\Bootcamp\Unit 8\Lesson 2: Membership in the cluster.3. 加入集群源: Docs\Bootcamp\Unit 8\Lesson 3: Joining to the cluster.分布式架构中,服务发现的功能集群中的元信息服务的一致性注册和监控组件可用性的机制组件发现的机制服务发现Proto.Cluster.ConsulProto.Cluster.SingleRemoteInstance4. 在集群中处理任务源: Docs\Bootcamp\Unit 8\Lesson 4: Processing tasks in the ClusterTODO: 学习记录, 此处继续 -
![Docker笔记]() Docker笔记 示例DockerfileFROM alpine:latest ARG TAG=0.0.1 ARG PORT_ARG=3080 RUN apk add --no-cache bash # 切换默认shell为bash SHELL ["/bin/bash", "-c"] RUN echo tag=$TAG RUN echo port_tag=$PORT_ARG构建docker build --no-cache --progress plain --rm --build-arg TAG=0.0.3 --build-arg PORT_ARG=3000 --tag hello/world:0.0.3 .运行docker run hello/world:0.0.3笔记ARG 用来声明参数,语法为ARG <key>=<default-value>,需要在在FROM之后才会有作用build时, 通过--build-arg的方式传递,语法为--build-arg <key>=<value>, 可以多组参考How To Pass Environment Info During Docker BuildsDocker: How to use bash with an Alpine based docker image?
Docker笔记 示例DockerfileFROM alpine:latest ARG TAG=0.0.1 ARG PORT_ARG=3080 RUN apk add --no-cache bash # 切换默认shell为bash SHELL ["/bin/bash", "-c"] RUN echo tag=$TAG RUN echo port_tag=$PORT_ARG构建docker build --no-cache --progress plain --rm --build-arg TAG=0.0.3 --build-arg PORT_ARG=3000 --tag hello/world:0.0.3 .运行docker run hello/world:0.0.3笔记ARG 用来声明参数,语法为ARG <key>=<default-value>,需要在在FROM之后才会有作用build时, 通过--build-arg的方式传递,语法为--build-arg <key>=<value>, 可以多组参考How To Pass Environment Info During Docker BuildsDocker: How to use bash with an Alpine based docker image? -
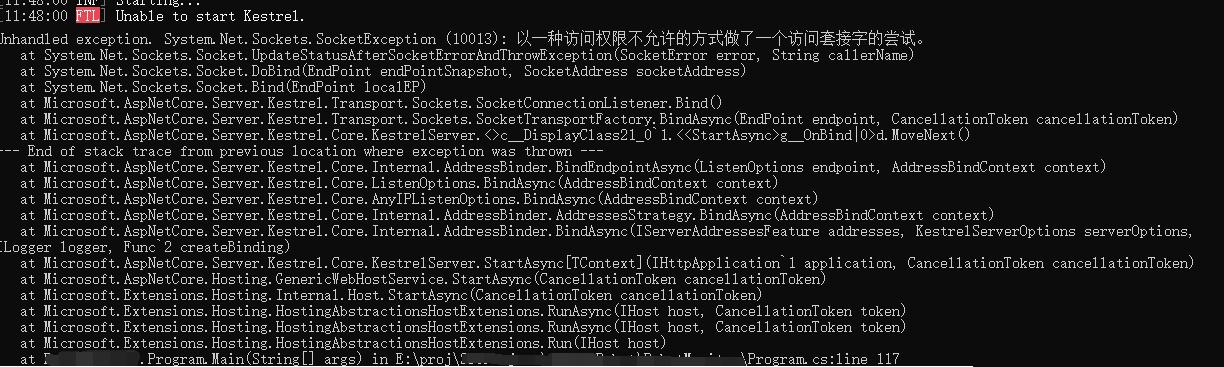
![(Windows)以一种访问权限不允许的方式做了一个访问套接字的尝试处理]() (Windows)以一种访问权限不允许的方式做了一个访问套接字的尝试处理 有一个ASP.NET Core的项目,使用了一个固定端口13501, 突然有一天,启动项目时,报System.Net.Sockets.SocketException (10013): 以一种访问权限不允许的方式做了一个访问套接字的尝试的异常,无法监听端口。此时第一反应是其他程序占用了13501端口,于是在cmd(出于bug敏感,直接以管理员身份启动)中执行netstat -ano | findstr 13501,发现啥也没有,说明不是被其他程序占用了,但是为何不让我监听使用呢?经过一番搜索/尝试/验证后,似乎在Stack Overflow上找到了方向:Kestrel unable to start在cmd尝试执行netsh interface ipv4 show excludedportrange protocol=tcp, 果然发现了13501是在排除范围之内(13492~13591):那么就想,能否移除这条规则呢,通过搜索来的命令,修改相关端口范围后执行:netsh interface ipv4 delete excludedportrange protocol=tcp startport=13492 numberofports=100果然发现自己还是太天真了。。。那怎么办呢?虽然曾经遇到这个问题后浅尝辄止,搞不定后直接重启,每次都可以解决,但是系统任务栏一排软件开启的,浏览器中无数个标签打开的,重启代价太大,而且这个问题就像个地雷,指不定以后啥时候还会在遇到,于是决定以excludedportrange为搜索关键词继续查找。终于,在Stack Overflow的兄弟网站StackExchange/superuser看到了希望。继续尝试看到的指令的指令(先停止掉NAT服务,然后再开启):net stop winnat netsh interface ipv4 show excludedportrange protocol=tcp net start winnat netsh interface ipv4 show excludedportrange protocol=tcp咦~好像OK了(判断依据: 13501已经不在排除端口范围之内了),再次运行我的ASP.NET Core的项目,正常监听,再(多此一举)看下端口监听:netstat -ano | findstr 13501一切正常,问题解决。参考Kestrel unable to startUnable to start Kestrel getting 'An attempt was made to access a socket in a way forbidden by its access permissions'Many excludedportranges how to delete - hyper-v is disabledUnable to bind ports: Docker-for-Windows & Hyper-V excluding but not using important port ranges #3171
(Windows)以一种访问权限不允许的方式做了一个访问套接字的尝试处理 有一个ASP.NET Core的项目,使用了一个固定端口13501, 突然有一天,启动项目时,报System.Net.Sockets.SocketException (10013): 以一种访问权限不允许的方式做了一个访问套接字的尝试的异常,无法监听端口。此时第一反应是其他程序占用了13501端口,于是在cmd(出于bug敏感,直接以管理员身份启动)中执行netstat -ano | findstr 13501,发现啥也没有,说明不是被其他程序占用了,但是为何不让我监听使用呢?经过一番搜索/尝试/验证后,似乎在Stack Overflow上找到了方向:Kestrel unable to start在cmd尝试执行netsh interface ipv4 show excludedportrange protocol=tcp, 果然发现了13501是在排除范围之内(13492~13591):那么就想,能否移除这条规则呢,通过搜索来的命令,修改相关端口范围后执行:netsh interface ipv4 delete excludedportrange protocol=tcp startport=13492 numberofports=100果然发现自己还是太天真了。。。那怎么办呢?虽然曾经遇到这个问题后浅尝辄止,搞不定后直接重启,每次都可以解决,但是系统任务栏一排软件开启的,浏览器中无数个标签打开的,重启代价太大,而且这个问题就像个地雷,指不定以后啥时候还会在遇到,于是决定以excludedportrange为搜索关键词继续查找。终于,在Stack Overflow的兄弟网站StackExchange/superuser看到了希望。继续尝试看到的指令的指令(先停止掉NAT服务,然后再开启):net stop winnat netsh interface ipv4 show excludedportrange protocol=tcp net start winnat netsh interface ipv4 show excludedportrange protocol=tcp咦~好像OK了(判断依据: 13501已经不在排除端口范围之内了),再次运行我的ASP.NET Core的项目,正常监听,再(多此一举)看下端口监听:netstat -ano | findstr 13501一切正常,问题解决。参考Kestrel unable to startUnable to start Kestrel getting 'An attempt was made to access a socket in a way forbidden by its access permissions'Many excludedportranges how to delete - hyper-v is disabledUnable to bind ports: Docker-for-Windows & Hyper-V excluding but not using important port ranges #3171 -
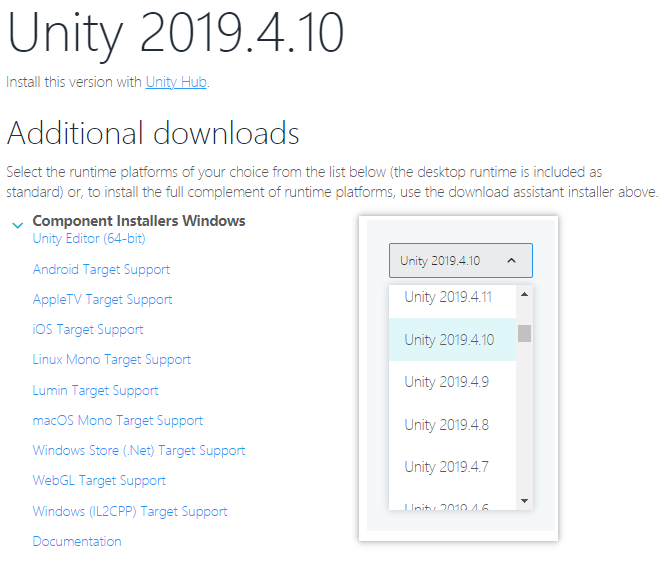
![Unity独立安装后添加IL2CPP等编译组件]() Unity独立安装后添加IL2CPP等编译组件 如果Unity不是通过Unity Hub安装的,而是通过"添加已安装版本"添加到Unity Hub中时,并不能通过Unity Hub动态添加编译平台组件,而是需要单独下载。以 Unity 2019.4.10f1 添加 IL2CPP 编译组件为例,操作如下:进入 Unity 2019.4.10 页面如果是其他版本,则选择你已安装的Unity的对应的版本在 Component Installers Windows 或 Component Installers macOS 下选择要添加的编译组件, 此处选择 Windows (IL2CPP) Target Support 下载 IL2CPP 编译组件的安装包。下载后安装即可,需要注意的是 Choose Install Location 这一步,需要,选择你的 Unity.exe 上层目录 Editor 的上层目录(示例: 我的 Unity.exe 完整路径为 D:\installeds\Unity\2019.4.10f1\Editor\Unity.exe, 则此处需要选择的路径应该为 D:\installeds\Unity\2019.4.10f1),否则会报错说找不到 Unity.exe
Unity独立安装后添加IL2CPP等编译组件 如果Unity不是通过Unity Hub安装的,而是通过"添加已安装版本"添加到Unity Hub中时,并不能通过Unity Hub动态添加编译平台组件,而是需要单独下载。以 Unity 2019.4.10f1 添加 IL2CPP 编译组件为例,操作如下:进入 Unity 2019.4.10 页面如果是其他版本,则选择你已安装的Unity的对应的版本在 Component Installers Windows 或 Component Installers macOS 下选择要添加的编译组件, 此处选择 Windows (IL2CPP) Target Support 下载 IL2CPP 编译组件的安装包。下载后安装即可,需要注意的是 Choose Install Location 这一步,需要,选择你的 Unity.exe 上层目录 Editor 的上层目录(示例: 我的 Unity.exe 完整路径为 D:\installeds\Unity\2019.4.10f1\Editor\Unity.exe, 则此处需要选择的路径应该为 D:\installeds\Unity\2019.4.10f1),否则会报错说找不到 Unity.exe -
![WSL虚拟磁盘清理]() WSL虚拟磁盘清理 使用 SpaceSniffer 查找出wsl虚拟磁盘位置SpaceSniffer下载地址及使用 请参见文章 Windows上使用工具推荐PowerShell 中查看wsl系统列表,将其关闭,然后进入diskpartwsl --list # `wsl --list`显示内容如下方注释所示 # 适用于 Linux 的 Windows 子系统分发版: # Ubuntu (默认) wsl --terminate Ubuntu diskpartdiskpart中操作select vdisk file=C:\Users\gsw94\AppData\Local\Packages\CanonicalGroupLimited.UbuntuonWindows_79rhkp1fndgsc\LocalState\ext4.vhdx compact vdisk exit参考Deleting a directory in WSL to free up disk space?WSL 2 should automatically release disk space back to the host OS
WSL虚拟磁盘清理 使用 SpaceSniffer 查找出wsl虚拟磁盘位置SpaceSniffer下载地址及使用 请参见文章 Windows上使用工具推荐PowerShell 中查看wsl系统列表,将其关闭,然后进入diskpartwsl --list # `wsl --list`显示内容如下方注释所示 # 适用于 Linux 的 Windows 子系统分发版: # Ubuntu (默认) wsl --terminate Ubuntu diskpartdiskpart中操作select vdisk file=C:\Users\gsw94\AppData\Local\Packages\CanonicalGroupLimited.UbuntuonWindows_79rhkp1fndgsc\LocalState\ext4.vhdx compact vdisk exit参考Deleting a directory in WSL to free up disk space?WSL 2 should automatically release disk space back to the host OS